

材料:
油漆:(任何品牌,除非确定)象牙黑、棕土颜料、透明棕色(Schmincke)、透明氧化铁(Gamblin),紫红;镉红灯、镉橙、镉黄介质、那不勒斯黄灯,鹅黄色深,黄赭石、透明地球黄色(Gamblin)、暗绿色、橄榄绿色、国王蓝光(老荷兰或Schmincke),天蓝色,深蓝色,紫罗兰(Gamblin)锰,钛白色,亮黄灯(老荷兰)、钛镍黄灯
画笔:合成软笔刷(所有尺寸)
帆布:新传统艺术板(L600),Claussens 13 dp(对于较大的拉伸件)
循序渐进的演示:
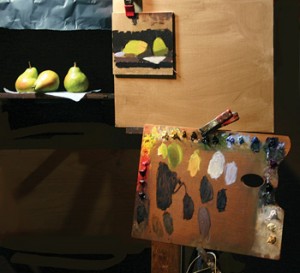
1。颜色的研究:在开始油漆,我总是做一个颜色或海报研究(这是6×9),它由色块不混合(顶部中心)。我开始我的研究发现最黑暗的黑暗眯着眼,然后从黑暗到光明的颜色。我不画;我看到只有在值和颜色。海报的研究成为一个参考指南我油漆更大的画布。
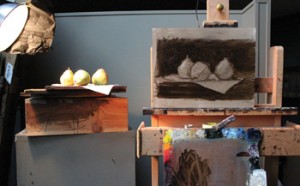
2。健美帆布:我用生赭和Turpenoid和应用混合物用湿布调画布中间值。对于此演示我使用一个新的传统艺术小组,我喜欢对较小的绘画,因为我可以减少每个面板的大小。我喜欢L600,细牙。
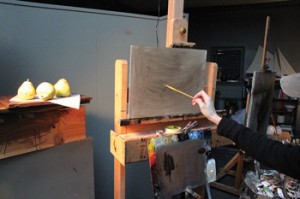
3。起见:因为我们的目标是完成这个演示一个画在三天,我做了一个非常快速的素描或起见的梨在生赭Turpenoid混着一点。
4。背景:援助在敲定绘图,我填写背景与生赭和Turpenoid;这种做法设置画好,为我的下一步的绘画在黑暗的背景。
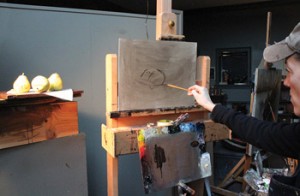
5。深色的:我继续和填写底部和所有的黑暗在这里。拥有所有的感光的地方真的帮助我看到图纸一起。
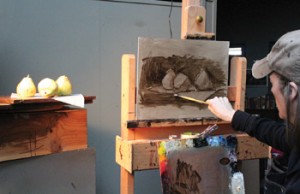
6。概念图在大形状:咨询我的色彩研究和关注价值,我集中在大的形状。同时,我注意到黑暗的时间间隔。
7。工作从黑暗到光明从梨在左边,我一步步从梨的影子,慢慢地进入了光。我不想获得第一个梨太完成没有放下一些颜色和价值观在另外两个。
8。评估工作:我的背景仍然是种粗糙的梨,因为我没有准备好提交到我还边。我混合湿背景到梨给他们的形状和尺寸。然后,当表面完全覆盖,我做了调整,在此期间,我添加了一些中间色调之间的阴影和光线的梨。最后我点亮了我的强调。
因为我没能完成这幅画在车间,我花了大概一个小时可以在家里。我从来没有真正的工作在一个绘画没有我的话题在我前面。这是危险的!有可能你做的决定是一个更好的生活画从一个比你会如果你开摆弄它之后。在这种情况下我意识到我的空间在桌面有点太暗,太冷。在静物画,画了许多相似的设置,我知道我可以解决这个问题用一点点温暖和较轻的语气。
因为我的画已经成为完全摸上去干,回到工作室我“油”——使用混合的亚麻籽油和一个小Turpenoid刷上恢复了光泽的暗了之后。加油几乎是像涂漆,但您可以安全地工作回到绘画。我下一个混合象牙黑和一个触摸的镉红灯和画它在桌面来就到边缘。
然后我把我的最小的刷子和,而绘画仍在油出相位和容易的工作,我添加了一个微小的温暖的基调,光明和黑暗之间。这是完整的示范,三个梨(油、13×16)。
原文如下:
Materials:
Paints: (any brand unless identified)ivory black,raw umber, transparent brown (Schmincke), transparent red oxide (Gamblin), alizarin crimson; cadmium red light, cadmium orange, cadmium yellow medium, Naples yellow light, Naples yellow deep, yellow ochre, transparent earth yellow (Gamblin), sap green, olive green, Kings blue light (Old Holland or Schmincke), cerulean blue, ultramarine blue, manganese violet (Gamblin), titanium white, brilliant yellow light (Old Holland), titanium nickel yellow light
Brushes: synthetic soft brushes (all sizes)
Canvas: New Traditions art panels (L600), Claussens 13DP (for larger stretched pieces)
Step-by-Step Demo:
1. Color Study: Before starting to paint, I always do a color or poster study (this one is 6×9), which consists of patches of color that aren’t blended (top center). I begin my study by squinting to find the darkest dark and then proceed from dark to light colors. I don’t draw; I see only in value and color. The poster study becomes a reference guide as I paint the larger canvas.
2. Toned Canvas: I use raw umber and Turpenoid and apply the mixture with a damp cloth to tone the canvas to a middle value. For this demonstration I used a New Traditions art panel, which I like for smaller paintings because I can cut each panel to size. I like the L600, which has a finer tooth.
3. Block-In: Since our goal for this demo was to complete a painting in three days, I did a very quick sketch or block-in of the pears in raw umber mixed with a little Turpenoid.
4. Background: To aid in nailing down the drawing, I filled in the background with raw umber and Turpenoid; this practice sets up the painting nicely for my later step of painting in the dark background.
5. The Darks: I went ahead and filled in the bottom and all the darks while I was at it. Having all the darks in place really helps me see the drawing come together.
6. Massing in the Big Shapes: Consulting my color study and paying close attention to value, I massed in the big shapes. At the same time, I paid attention to the intervals of darkness.
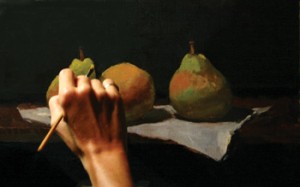
7. Working from Dark to Light: Starting with the pear on the left, I worked my way from the pear shadow up, slowly into the light. I didn’t want to get the first pear too finished without putting down some color and values on the other two.
8. Evaluating the Work: My background was still kind of rough around the edges of the pears because I wasn’t ready to commit to my edges just yet. I blended the wet background into the pears to give them shape and dimension. Then, when the surface was completely covered, I did the fine-tuning, during which I added some middle tones between the shadow and the light of the pears. Finally I brightened my highlights.
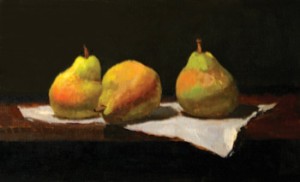
Since I wasn’t able to finish the painting in the workshop, I spent about an hour more on it at home. I never really work on a painting without my subject in front of me. It’s dangerous! Chances are whatever decision you make when painting from life is a better one than what you’d make if you start tinkering with it later. In this case I realized that my space under the tabletop was a little too dark and too cold. Having painted many still lifes that were similar in setup, I knew that I could fix the problem with a little warmth and a lighter tone.
Because my painting had become completely dry to the touch, back in the studio I “oiled out”—using a mixture of linseed oil and a little Turpenoid brushed on to bring back the lustre of the darks after they had sunk in. Oiling out is almost like varnishing, but you can safely work back into the painting. I next mixed ivory black and a touch of cadmium red light and painted it under the tabletop—coming just up to the edge.
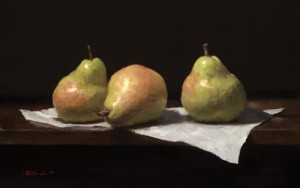
Then I took my smallest brush and, while the painting was still in an oiled-out phase and easy to work into, I added a tiny warm tone between the light and the dark. Here’s the completed demonstration, Three Pears (oil, 13×16).


