

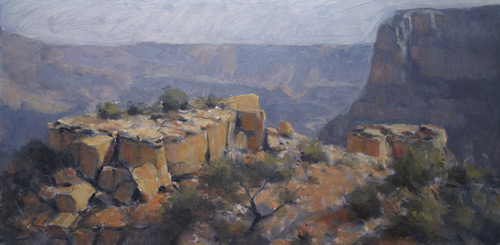
为我的工作室画莫兰点,我使用照片和一些练习的草图颜色参考空气。我想重感情的大峡谷的深度和距离,但我也想锚观众一些活灵活现的岩石在前台。此外,通过启动幅用单色灰色画底色,我能够“钉”灯光及深色快速、轻松地。有时如果我单独值的问题的问题,颜色和处理价值第一,我的绘画似乎更容易在早期阶段。
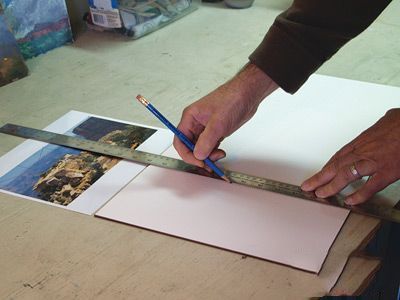
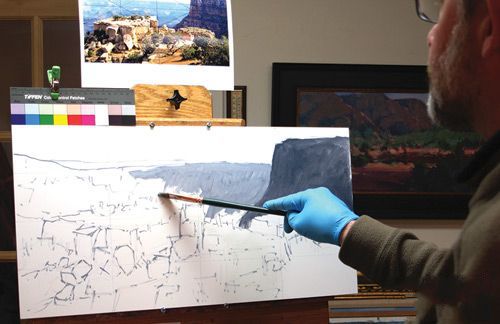
1。画一个表格:画一个简单的电网后对我的照片有好点狡猾的人,我画了一个类似的网格曲面上与2号石墨铅笔准备转让设计。我使用一个轻触所以铅笔记号不透明通道的下方就会消失在我的表面油漆,一个12×24片Gessobord &。
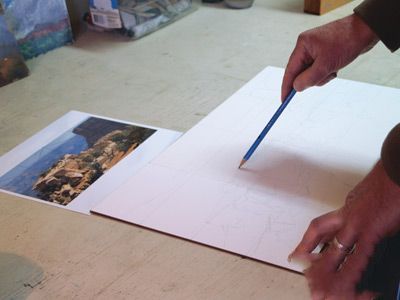
2。将设计:继续用铅笔,我画的主要形状松散在设计同时也关注形式的岩石面满足平面或裂缝侵入。
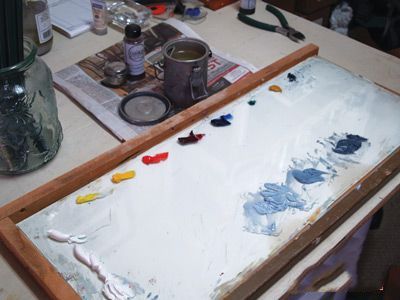
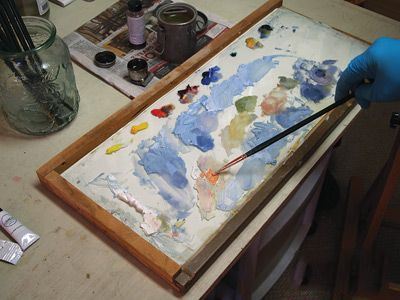
3。分裂主面板:为我的调色板,我使用一个找片玻璃用一张白纸下面。我的颜色是由Gamblin(左至右):钛锌、镉黄灯,白色镉黄深,镉红灯,永久的暗红,深蓝色,绿色,黄金phthalo赭色,色黑。这是我的标准,与黄金分割主要调色板赭石和色黑如补充剂。另外,我已经预先混合的三个值使用白色和彩色的黑灰色。
面板上面,我有一个小集装箱的Gamsol Gamblin无味溶剂油(OMS)和一个集装箱的Galkyd Gamblin Lite介质。
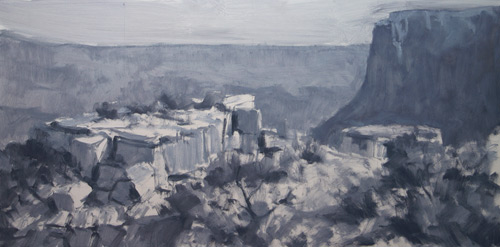
4。最初的草图:接下来,我重新修改我的铅笔描与变薄,值的灰色和4号天然猪鬃平。对于这幅画,我用所有的公寓,Nos。2、4、6、8(所有大奖赛刷子从银刷有限公司)。
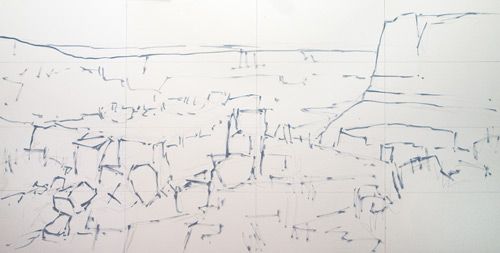
5。形状和价值观:然后,从我的三个值的灰色和一个8号公寓,我封锁在我的主要形状。我开始与深色第一和工作我的方式到轻值。油漆很瘦,但不滴落的湿与稀释剂。我喜欢思考什么样的理查德·施密德说在他的书中,真主安拉首席:“薄漆并不一定意味着变薄漆。“我用足够的无味溶剂油(OMS)薄漆所以很容易在表面流动。
6。完善单色:这是填好的单色灰色起见。当我正在评估自己的价值选择,我决定,我的浅灰色不是很足够轻的天空,所以我用纸巾去除一些油漆和减轻它。我用纸巾类似的调整需要在这里和那里。是很重要的绘画“阅读”这一阶段,单色的
7。绘制岩石:在我建立了我的暗灰色的,我想把重点放在光形状第一和添加一些真正的颜色。一个混合的黄金赭石和白色,有可能有点永久暗红,给了我阳光普照的音调的岩石。
顺便说一下,当岩石,我总是画油画他们首先是非常角形状。我画出轮廓,即使岩石似乎圆在现实生活中,作为一系列相互连接的直线。当我继续油漆的岩石,这些直线和圆会柔和。如果你开始“圆”,事情只会变得更糟,你就会有一幅充满“烤土豆。“我宁愿夸大生硬和也黑暗和厚度的裂缝和缝隙比太微妙。我总是可以使事情更微妙的后来。
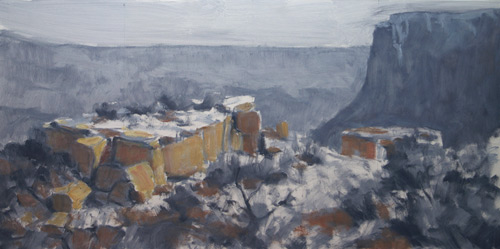
8。从薄:在这一步我申请第一遍色。你会注意油漆在天空是那么瘦,你可以看到刷标志和一些白色Gessobord显示通过。德国绿党的灌木和其他植被,我只用黄金赭石和色黑,这给了我准确的那种沉闷的绿色我看过在大峡谷(初学者往往走得生动与绿党)。
顺便说一下,我用非常小的蓝色在这幅画。群青色只出现在天空中,在遥远的峡谷,在阴影的悬崖的中间,大多数认为蓝色是什么色黑加白实际上是。
在绘画的一个好处湿到湿在一个灰色的画底色是灰色会激起和混合的颜色添加后轻柔,灰色他们略。我发现许多开始画家很难控制浓度与我分离主面板,从灰色是一个很好的方式来保持颜色有点沉默。如果我想要一个非常丰富的颜色通道,我总是可以涂上一些好,丰富的油漆厚加载刷或刀结束。
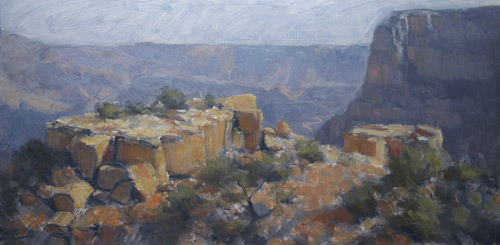
9一个。注意深色和亮点:这里是我需要马克我的极端值。首先,我注意到最黑暗的黑暗。我也想使岩石看起来甚至craggier,所以我打了我黑暗的黑暗以灰色和添加多一点色黑,再加上一个小镉红灯热身混合物略。我的黑暗的黑暗在大多数嵌入岩石阴影。
接下来,我提到我的轻的灯,顶部和边缘的岩石,获得最直接的阳光。我用白色加上民建联的黄金赭石和镉黄灯为这些口音。你会看到,我还要去一个小打火机向边缘画几个点。
9 b。调色板在过程:这是我的调色板我接近结束的绘画。我试图保持调色板组织,这样我就能找到我的混合物很容易。同时,作为调整油漆混合物,我试图保持原有的一些油漆混合物
没有所以我可以把它如果我需要。在我原来的排分割主要颜色,我有一系列的蓝灰色,我混了天空,遥远的峡谷墙壁。下面是一系列的暖色为阳光照射的岩石。下面这是剩下的我原来的三个成堆的灰色。
顺便说一下,我用一个小Gamblin Galkyd Lite在这些后来混合物帮助漆流更好和更快的干燥。我发现有很多白色的混合物,比如天空的颜色的光,需要更多的媒介更好的流。
9 c。应用厚漆:在这里我应用厚漆天空,加深一些感光遥远的峡谷壁,添加一个触摸的蓝色,和精制影子通道在悬崖中间立场。在前台区域,我热身一些反射的光区岩石阴影,阳光照射的区域变平坦的地面上,并调整形状的植被。此外,我添加了一个小淡蓝灰色阴影区域关键岩石间。这些段落表明有些地方的天空光弥漫进了阴影。
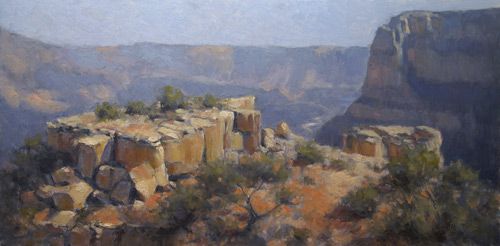
9 d。增加光:完成莫兰点(油、12×24),我应用较厚,较轻的漆光强调被要求和软化一些暗色调的岩石上。我也增加了光在遥远的峡谷壁和,最后,改善了与一些微妙的云的天空。

For my studio painting Moran Point, I used a photo and several plein air sketches for color reference. I wanted to re-create the feeling of the Grand Canyon’s depth and distance, but I also wanted to anchor the viewer with some solid-looking rocks in the foreground. Additionally, by starting the painting with a monochromatic gray underpainting, I was able to “nail” the lights and darks quickly and easily. Sometimes if I separate the issue of value from the issue of color and handle value first, my paintings seem to go more easily in the early stages.
1. Drawing a grid: After drawing a simple grid on my photograph with a fine-point Sharpie, I drew a similar grid on my surface with a No. 2 graphite pencil in preparation for transferring the design. I used a light touch so the pencil marks would disappear beneath opaque passages of oil paint on my surface, a 12×24 sheet of Ampersand Gessobord.
2. Transferring the design: Continuing with the pencil, I loosely sketched in the major shapes in the design while also paying attention to the forms of the rocks—where plane meets plane or where cracks intrude.
3. Split-primary palette: For my palette, I use a custom-cut sheet of glass with a sheet of white paper beneath it. My colors are by Gamblin (left to right): titanium-zinc white, cadmium yellow light, cadmium yellow deep, cadmium red light, permanent alizarin crimson, ultramarine blue, phthalo green, gold ochre, and chromatic black. This is my standard, split-primary palette with gold ochre and chromatic black as supplements. Additionally, I’ve premixed three values of gray using white and chromatic black.
Above the palette, I have a small container of Gamblin Gamsol odorless mineral spirits (OMS) and a container of Gamblin Galkyd Lite medium.
4. Initial sketch: Next I redrew my pencil sketch with a thinned, midvalue gray and a No. 4 natural hog bristle flat. For this painting, I used all flats, Nos. 2, 4, 6, 8 (all Grand Prix brushes from Silver Brush Ltd).
5. Shapes and values: Then, starting with my three values of gray and a No. 8 flat, I blocked in my major shapes. I started with the darks first and worked my way up to the lighter values. The paint was thin, but not drippy-wet with thinner. I like to think of what Richard Schmid says in his book, Alla Prima: “Thin paint doesn’t necessarily mean thinned paint.” I use just enough odorless mineral spirits (OMS) to thin the paint so it flows easily across the surface.
6. Perfecting the monochrome: Here is the completed monochromatic gray block-in. As I was evaluating my value choices, I decided that my light gray wasn’t quite light enough for the sky, so I used a paper towel to remove some paint and lighten it. I made similar adjustments with a paper towel here and there as needed. It’s important to have the painting “read” well in this monochromatic stage.
7. Drawing the rocks: After I’d established my darks with the grays, I wanted to focus on the light shapes first and add some real color. A mixture of gold ochre and white, with perhaps a touch of permanent alizarin crimson, gave me the sunlit tones of the rocks.
By the way, when painting rocks, I always draw them first as very angular shapes. I draw the outlines, even if the rocks seem round in real life, as a series of interconnected straight lines. As I continue to paint the rocks, these straight lines will get softer and rounder. If you start “round,” things will only get worse, and you’ll end up with a painting full of “baked potatoes.” I would rather exaggerate the angularity—and also the darkness and thickness of cracks and crevices—than be too subtle. I can always make things subtler later.
8. Starting thin: In this step I applied the first pass of color. You’ll note the paint in the sky is so thin you can see brush marks and some of the white Gessobord showing through. For the greens of the bushes and other vegetation, I used only gold ochre and chromatic black, which gave me exactly the kind of dull green I’ve seen at the Grand Canyon (beginners often go too vivid with the greens).
By the way, I used very little blue in this painting. Ultra-marine blue appears only in the sky, in the distant canyon, and in the shadows of the cliff in the middle ground; most of what is perceived as blue is actually chromatic black plus white.
One of the benefits in painting wet into wet on a gray underpainting is that some of the gray will stir up and mix softly with the colors added later, graying them slightly. I find that many beginning painters have a hard time controlling chroma with my split-primary palette, and starting with gray is a good way to keep colors somewhat muted. If I want a spectacularly rich passage of color, I can always slather on some good, rich paint with a thickly-loaded brush or knife at the end.
9a. Noting the darks and highlights: This is the point where I needed to mark my extremes of value. First, I noted the darkest darks. I also wanted to make the rocks look even craggier, so I punched up the darks by taking my darkest gray and adding a bit more chromatic black to it, plus a little cadmium red light to warm up the mixture slightly. My darkest darks are in the most recessed shadows in the rocks.
Next, I noted my lightest lights, which are the tops and edges of the rocks that receive the sunlight most directly. I used white plus a dab of gold ochre and cadmium yellow light for these accents. You’ll see that I go even a little lighter toward the edges of the painting in a few spots.
9b. Palette in process: Here’s my palette as I neared the end of the painting. I tried to keep the palette organized so I could find my mixtures easily. Also, as I adjusted paint mixtures, I tried to keep some of the original paint mixture
untouched so I could refer to it if I needed to. Beneath my original row of split-primary colors, I had a series of blue-grays that I mixed for the sky and distant canyon walls. Beneath that was a series of warm colors for sunlit rocks. Below that was what’s left of my original three piles of gray.
By the way, I used a little Gamblin Galkyd Lite in these later mixtures to help the paint flow better and dry faster. I find that mixtures with a lot of white, such as the light sky colors, require more medium for better flow.
9c. Applying thicker paint: Here I applied thicker paint to the sky, deepened some of the darks in the distant canyon wall, added a touch of blue, and refined the shadow passages in the middle-ground cliff. In the foreground area, I warmed up some of the bounced light areas in the rock shadows, reddened the sunlit areas of flat ground, and adjusted the shapes of the vegetation. Additionally, I added a little light blue-gray to key shadow areas among the rocks. These passages indicate where some of the sky light diffuses down into the shadows.
9d. Increasing the light: To finish Moran Point (oil, 12×24), I applied thicker, lighter paint where light highlights were required and softened some of the dark accents on the rocks. I also increased the light in the distant canyon wall and, finally, improved the sky with some subtle clouds.


