材料我用于油画教程
- 石油刷一个平面,一些榛子,长尖圆,另一个素描小圆的细节。
- 油油漆柠檬黄色,镉黄介质、暗红、深蓝色、天蓝色、钛白。
准备一个成功的绘画
- 使用取景器隔离和作物的主题。
- 做一些缩略草图来确定价值关系和组合。
- 躺着一个稀释的洗gessoed matboard镉橙在一夜之间,让它风干。橙色(或类似的暖色)是我最喜欢的底色为风景,因为它补充了蓝色和绿色的一个典型的山水画。
这是我选择的视图为本教程。这是一个非常平衡的组合,但没有特别出色。
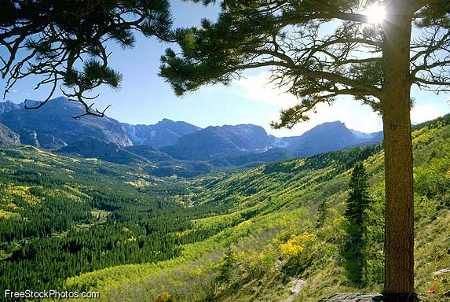
当我使用照片,我总是把相机记住的局限性。因此,我不要试图复制照片中的一切。还有,记住,没有“完美”的观点在自然。你的眼睛当你高兴什么都在这里看着它可能不是翻译好当存入到一个二维曲面。
很多时候,做一个更强的画,你需要改变一些元素在里面。或者,简单地消除一些事情使作文更简单。像专业作家,我们必须“编辑的内容在我们提交到画布上。
好吧,让我们开始。
油画教程-步骤1
在决定视图和画出几个可能的成分在我的画板,我看看我的选项,选择其中一个粗略描绘组成图画作品。使用一个小圆刷,我开始大量的松散勾勒我的主题在黑板上。
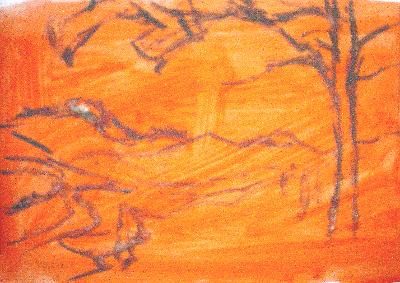
油画教程-步骤2
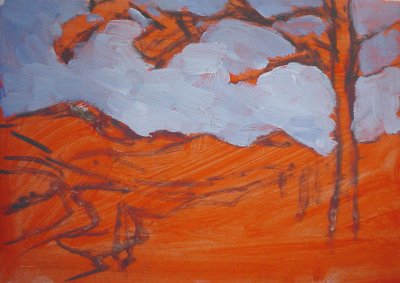
我开始从顶部的板-天空的背景。我混合成白色,天蓝色的天空,不使用任何溶剂,和我与我的最大应用它刷。我改变树荫下通过调整比率白色和天蓝色。
当画风景画,我总是先从天空开始,因为我想保持区域的清洁。我工作大约在树的轮廓。我喜欢工作在一个自上而下,前后颠倒的顺序,以保持尽可能的干净的颜色。在其他题材,如静物和肖像,它不是作为关键,我做这个,但我仍然普遍做的。
油画教程-步骤3
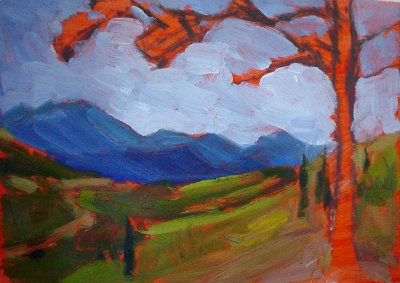
在天空,我很快放下其他主要形状分为音调。我工作在树周围的天空。天空的颜色是精心地围着树。仍然使用大刷,我躺平的颜色为每个指定的形状。在这一点上没有细节。我保持专注和谨慎的在这至关重要的阶段,如果我开始与强大的抽象颜色形状,我在正确的轨道上。所以,现在,大形状是好的,和更少的形状甚至更好。
群山背景是蓝色的。当他们退去,他们的颜色褪色。这是“空中透视”工作。我添加白色到灰色,蓝色,然后用一些橙或灰色(如果是在手)。如果我花时间把颜色正确,我可以创建一个错觉的深度和距离。
油画教程-步骤4
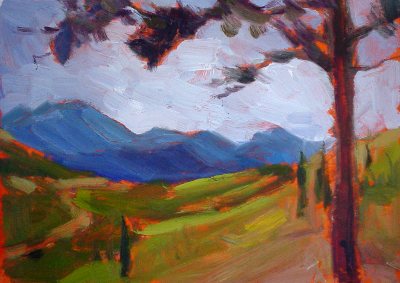
我闭上眼睛的中途“编辑”分心的细节。我退后一步,看看这幅画从远处看。如果大形状之间的关系很好,那么现在是时候继续添加一些改进。
有许多形状在草地上。我找他们的颜色和色调差异。最重要的是,它是基调,吸引了我的注意。我把我的颜色和它们相应的躺下或上以前的颜色。
一种颜色——一笔。
油画教程-步骤5
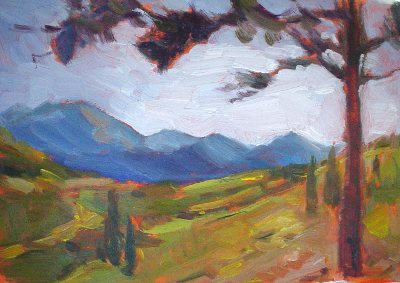
它很容易拖一个颜色在直到不再分开颜色它旁边或下面,但笔触必须大胆的和明确的,放置有目的。所以抵制诱惑,推动周围的色彩太多。同时,我改变我的一笔创造更多的利益。
在这一点上仍有不需要溶剂。越来越厚的颜料为更多的层都放下,但是我打算创建不超过四层的漆在我停止。否则颜色会变得模糊,看起来劳累!
页顶
油画教程-步骤6
它的时间来完善远处的山丘。以前我把他们作为山脉。现在我希望他们出现,让它们更环保和深色比遥远的地形。他们仍然必须小于草地,然而,深色的太。我必须判断音调相比较,其余的颜色和价值观在它周围。
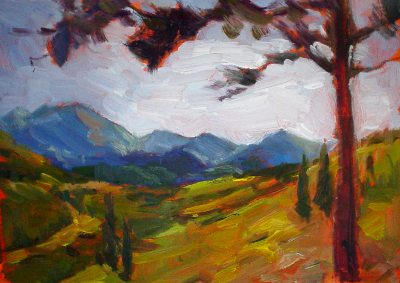
我下一个使用小刷子我添加细节和精炼的形状。我开始细化右边那棵大树。我添加足够的细节来建议树叶,没有陷入到细节。
油画教程-步骤7
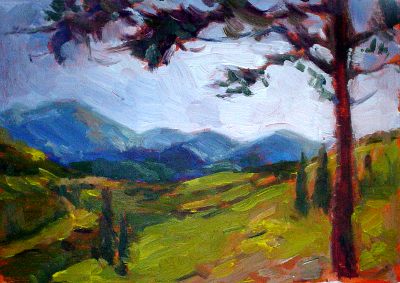
我完成这幅油画素描通过使用我的手指或清洁刷软化边缘的山脊与天空。同时,我想保持树尖锐,因为它是在前台。边控制通常是最后一步我的绘画过程。这种方式创建一个视觉路径和空间感和深度是增强。
注意,我已经添加了两个小树木抗衡株大树。
原文如下:
Materials I used for the oil painting tutorials
Oil Brushes—one flat, a few filberts, a long pointed round for sketching, and another small round for details.
Oil Paints—lemon yellow, cadmium yellow medium, alizarin crimson, ultramarine blue, cerulean blue, and titanium white.
Water for thinning the paint. (I use water soluble oil paints)
A gessoed acid-free matboard 6”X 9” (15cm x 22 cm).
Preparing for a successful painting
Use a viewfinder to isolate and crop the subject.
Do a few thumbnail sketches to determine value relationships and composition.
Lay a thinned wash of cadmium orange on the gessoed matboard and let it dry overnight. Orange (or a similar warm color) is my favorite undertone for landscapes, because it complements the blues and greens of a typical landscape painting.
This is the view I have chosen for this tutorial. It's a pretty well balanced composition, but not quite there yet.
When I am using a photo, I always keep the limitations of the camera in mind. As a result, I don't try to copy everything in the photo. Also, remember that there's no “perfect” view in nature. What pleases your eyes when you are right there looking at it might not translate well when placed onto a two dimensional surface.
Many times, to make a stronger painting, you need to shift a few elements here or there. Or, simply eliminate a some things to make the composition simpler. Like professional writers, we have to 'edit' the content before we commit it to the canvas.
Alright, let's get started.
Oil Painting Tutorials - Step 1
After deciding on the view and sketching out several possible compositions in my sketchpad, I look over my options and choose one of the roughly drawn composition drawings to work from. Using a small round brush, I begin to loosely sketch the large masses of my subject on the board.
Oil Painting Tutorials - Step 2
I start from the top of the board - the sky in the background. I mix cerulean blue into white for the sky, without using any solvents, and I apply it with my largest brush. I vary the shade by adjusting the ratio between white and cerulean blue.
When painting landscapes, I always start with the sky first because I want to keep that area clean. I work roughly around the silhouette of the tree. I prefer to work in a top-to-bottom, back-to-front sequence so as to keep the colors as clean as possible. In other subject matters, such as still life and portraits, it is not as critical that I do this, but I still generally do.
Oil Painting Tutorials - Step 3
After the sky, I quickly lay down the other major shapes grouped by tones. I work on the tree around the sky. The color of the sky is carefully worked around the tree. Still using a big brush, I lay down flat colors for each designated shape. No details at this point. I stay focused and cautious during this crucial stage; if I begin with strong abstract color shapes, I am on the right track. So, for now, big shapes are good, and fewer shapes are even better.
The mountains in the background are bluish. As they recede, their colors fade. This is “aerial perspective” at work. I add white into blues and then gray that with some orange or gray (if it's at hand). If I take the time to mix the colors right, I can create an illusion of depth and distance.
Oil Painting Tutorials - Step 4
I close my eyes halfway to 'edit out' the distracting details. I step back and look at the painting from a distance. If the relationships among the big shapes is good, then it is time to move on to add some refinements.
There are many shapes in the meadow. I look for them differences of color and tone. Mostly, it is the tone that draws my attention. I mix my colors accordingly and lay them either next to or on top of the previous colors.
One color - one brushstroke.
Oil Painting Tutorials - Step 5
It is tempting to drag a color around until it is no longer separate from the color next to it or underneath, but brush strokes have to be bold and definite--placed with a purpose. So resist the temptation to push the colors around too much. At the same time, I vary my brushstroke to create more interest.
At this point there is still no need for solvents. The paints are getting thicker as more layers are laid down, but I intend to create no more than four layers of paint before I stop. Otherwise the colors get muddy and look overworked!
top of page
Oil Painting Tutorials - Step 6
It's time to refine the distant hills. Previously I treated them as part of the mountains. Now I want them to show up by making them greener and darker than the more distant terrain. They still have to be more muted than the meadows, however—and darker too. I have to judge the tone by comparing with the rest of the colors and values around it.
I next use smaller brushes as I add details and refine shapes. I start to refine the big tree on the right. I add enough details to suggest the foliage, without getting bogged down in the details.
Oil Painting Tutorials - Step 7
I finish this oil painting sketch by using my finger or a clean brush to soften the edges of the mountain ridges against the sky. At the same time, I want to keep the tree sharper, because it is in the foreground. Edge control is usually the last step of my painting process. This way a visual path is created and the sense of space and depth is enhanced.
Notice that I have added two small trees to counterbalance the big tree in the foreground.


