好的,如何画鸡蛋!你已经找到了我的示范绘画这个简单但难学的课程。这是一个两部分示范画鸡蛋,和第一部分是下面。
现在,你可能会注意到,有细微的差异,差异在于每个照片的至于大小和形状的所有元素。因为这不是我的正常发展,单一的绘画和层进入它的创建,但相反,这是一个演示,我将一起为本地艺术俱乐部。
它实际上是四个单独的画显示过程我使用。我要给你过,一些缺陷,发达我的画这些。我希望这将帮助你当你画鸡蛋在你下一次仍然生活。
什么是主要的目的在做鸡蛋吗?
向你展示了非常渐进阴影和圆的形式,可以实现多个层油漆。很少的媒介可以实现这样一个光滑的过渡,并证明它不是偶然的,它是做三次,在4单独画!
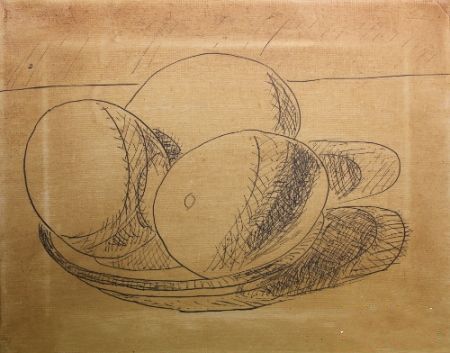
为了使成员看到这更好的我使用一个更厚的笔勾勒出主题。
在第一个照片,油画调色,铅笔绘图然后墨水画已经完成。交叉孵化的墨水画很重,图纸是简化。

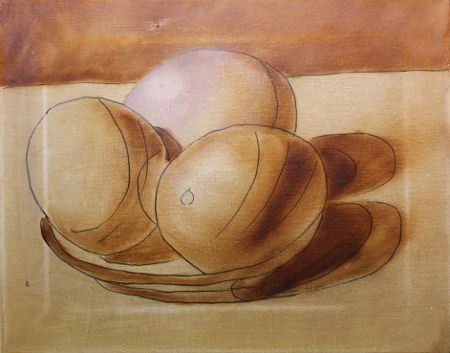
在这个第二照片,我们有棕色的衬层完成。在顶部的鸡蛋,我已经添加了白色显示一个额外的步骤,可以采取在这一层。
这只是显示领域,我想成为超级明亮的在最后一层。你可以看到同样的阴影和正在开发的形式在每一个蛋。
应用赭,融合,并软化与拖把刷得到你那里。
总是想着下一层,当某一层的工作。

有一件事我想我会记住在未来的绘画,这些鸡蛋投射阴影。右边的,大胆的墨水行影子其实是开始逐渐将导致我的问题。
我应该使用一个交叉孵化而非实线来显示这个衰落的影子。
您还会注意到一个白色的影子在边境的画约一英寸到画布上。这是由于应用了压力当使用剃刀去除灰尘和多余的油漆。
轻轻地喷涂后有点水/外用酒精混合,画布就会太紧了,帮助防止这个。

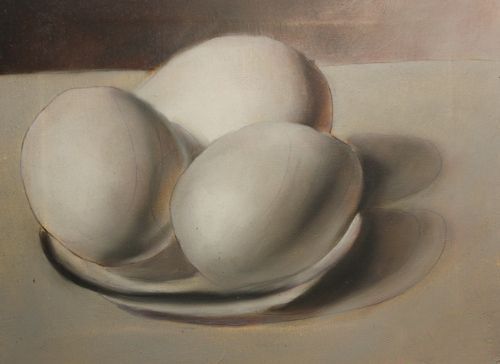
这下张照片是灰层。所以让我们开始讨论一些关于绘画的这一部分。
我的光线阴影边缘已经清除了几乎。同时,投影在右边仍表现出我的大胆的墨水画。我知道这是要给我一个问题。
注意右边的每一个蛋。我已经离开了相当多的布朗在绘画显示通过。这将代表软二次光晕从右边,我通常对我的一些静物画。
原文如下:
OK, how to paint eggs! You've found my demonstration on painting this simple but difficult subject. This is a two part demonstration to paint eggs, and the first part is below.
Now, you may notice that there are slight differences in each of the photo's as far as size and shape of all the elements. That's because this isn't my normal progression of a single painting and the layers going into it's creation, but rather, this is a demonstration I put together for my local art club.
It is actually four separate paintings showing the process I used. I'm going to show you too, some of the flaws that developed in how I painted these. Hopefully, this will help you when you paint eggs in your next small still life.
What is the main purpose in doing eggs?
To show you the very gradual shadow and round form that can be achieved with multiple layers of oil paint. Very few mediums can achieve such a smooth transition, and to prove it's not just an accident, it's done three times, on 4 separate paintings!
In order for the members to see this better I used a thicker pen to draw the outline of the subject matter.
In this first photo, canvas toning, pencil drawing then ink drawing has been completed. Cross hatching in the ink drawing is rather heavy and the drawing is simplified.
In this 2nd photo, we have the brown underlayer completed. In the top egg, I've added white to show an additional step that can be taken in this layer.
This was just to show an area that I wanted to be super bright in the final layer. You can see also the shadow and form being developed on each egg.
Applying the umber, blending, and softening with the mop brush gets you there.
Always be thinking about that next layer when working a particular layer.
17
One thing I think I will remember in future paintings, the cast shadow for these eggs. On the far right, the bold ink line where the shadow actually is beginning to fade is going to cause me problems.
I should have used a cross hatching rather than a solid line to show this fading shadow.
You will also notice a shadow of white around the border of the painting about an inch into the canvas. This is caused by applying to much pressure when using the razor to remove dust and excess paint.
By lightly spraying the back with a bit of water/rubbing alcohol mixture, the canvas will get tight again, and help in preventing this.
17
This next photo is of the gray layer. So lets talk some about this part of the painting.
My light shadow around the edges has been eliminated almost. Also, the cast shadow on the right side is still showing my bold ink drawing. I knew this was going to give me a problem.
Notice the right side of each egg. I've left quite a bit of brown under painting showing through. This will represent the soft secondary light glow from the right that I usually have on some of my still life paintings.
- See more at: https://www.easy-oil-painting-techniques.org/paint-eggs.html#sthash.MZkT4FvI.dpuf


