

论文使用:Bockingford不是,140磅。
天空1
准备一个温莎蓝色和混合光的红色。你需要油漆混合比。
与纸在一个轻微的角度。当水混合应用在水平笔触在他的宽度的天空,一珠油漆将形成底部的画。借此与下一个中风增加更多的油漆刷,如果必要的。当两个中风画添加更多的水来减轻颜色的油漆。继续添加水每一横。几乎是纯水混合时,没有洗擦,捡一些淡红色,继续在水平中风底部。当天空是干燥,混合光的红色和蓝色温莎,添加轮廓市容(如果需要形状可以得出第一)。保持混合水,没有硬干燥线将形成和油漆从左到右,反之亦然。
天空2
准备一个深蓝色的混合。你需要油漆混合比。
与论文水平。
湿纸从上到下,闪烁。顶部和工作开始画天空和云离开白皮书。接的刷漆,让刷的油漆到纸上,漂浮在水面上已经在纸上。论文水平,油漆会蔓延和软化点或多或少但要你把它放在哪里了。逐步添加更多的水到深蓝色天空减轻混合在它接近地平线。同时,云变得越来越小,因为他们到达地平线所以离开小区域未上漆的。随着地平线达到增加一点点光红略“灰色”组合的深蓝色。整个过程必须快速完成没有任何区域变得干燥,没有返回到画的区域。过程需要实践来减轻和修改颜色和认为云的形状是你油漆,所以不要指望第一次这样做。当天空是干燥的油漆完成一个简单的前景。
天空3
准备一个深蓝色黄赭的混合和混合光的红色和深蓝色。你需要油漆混合比。
湿的云区生黄土和保持是蓝天干燥的地区。云区是湿的,下降的混合物深蓝色和浅红色的云阴影会形成光来自左上角。略有不同的混合通过添加更多的光红或多个深蓝色直到你满意形状形成。不要乱在油漆区,一旦它在别管它。再次,而云区仍然是湿的,油漆混合在深蓝色的天空。光将达到云的边缘留下云彩和天空之间的差距。在其他领域的蓝色天空的云区。这将创建硬链接和软边缘分别。当天空面积干燥,油漆在一些山。(见景观一步一步)
天空4
准备一个温莎蓝色和混合光的红色。你需要油漆混合比。
与纸在一个轻微的角度。画上面的天空,在天空1。工作与温莎蓝色逐渐添加更多的水然后添加一点红色接近地平线。然后天空仍然是湿的,涂了云卷起塞的组织。组织干燥时,它将提升几乎所有的油漆和潮湿时,它将提升逐步减少油漆所以用干纸巾塞的云层和一个潮湿的内部和底部的云。的压力当洒也影响油漆的数量将被取消所以实验找到最好的效果。加入山和前景时天空是干燥。这个云影响效果最好与染色颜料原来色彩在纸上留下的痕迹给一个更现实的效果。
自我帮助:如果你有问题:如果硬线正在生产的天空区域的区域没有被足够的水。
如果颜色不够深,还需要更多的油漆混合流体,同时保持它。
不要忘记油漆,当添加到湿区域将被稀释,也总是比它看起来苍白干燥时湿——所以,如果它看起来对湿时,它不会正确的语气的时候干的。
如果运行支持发生在刷油漆的水比在纸上刷漆。
湿在潮湿工作时始终保持在油漆刷水(稍厚)低于画在纸上。当光泽的纸太干颜料应用于它的柔软效果
原文如下:
Try these Sky Doodles. They are all painted about 7 inches x 5 inches (18 cm x 13 cm).
Sky Area painted with No. 12 Round Brush, land areas painted with No. 6 Round Brush.
Paper Used: Bockingford Not, 140lb.
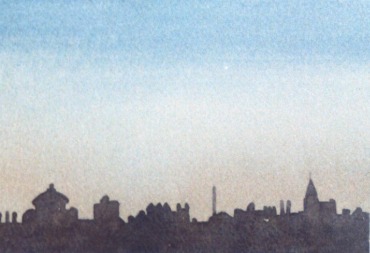
Sky 1 Sky 1
Prepare a mix of Winsor Blue and a mix of Light Red. Mix more paint than you need.
Work with the paper at a slight angle. When a watery mix is applied in a horizontal brush stroke across he width of the sky, a bead of paint will form at the bottom of the painted band. Take this up with the next stroke adding more paint to the brush if necessary. When a couple of strokes have been painted add more water to the paint to lighten the colour. Continue adding water on each horizontal stroke. When the mix is almost pure water, without washing the brush, pick up some light red and continue in horizontal strokes to the bottom. When the sky is dry, with a mix of light red and Winsor Blue, Add the silhouette townscape (The shapes can be drawn first if required). Keep the mix watery so that no hard drying lines will form and paint either from left to right or vice versa.
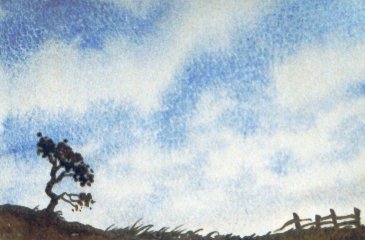
Sky 2 Sky 2
Prepare a mix of Ultramarine. Mix more paint than you need.
Work with the paper Horizontal.
Wet the paper from top to bottom so that the paper glistens. Start at the top and work down painting areas of sky and leaving white paper as clouds. Pick up a brush full of paint and let the paint flow out of the brush onto the paper so that it floats on the water already on the paper. With the paper horizontal, the paint will spread and soften a little but stay more or less where you put it. Gradually add more water to the Ultramarine to lighten the sky mix as it approaches the Horizon. Also, clouds get progressively smaller as they reach the horizon so leave smaller areas unpainted. As the horizon is reached add a little Light Red to the Ultramarine to slightly 'grey' the mix. The whole process must be completed quickly without any area becoming dry and without going back over painted areas. The process takes practice to lighten and modify colours and think of cloud shapes as you paint, so don't expect to do it first time. When the sky is dry paint on a simple foreground to complete.
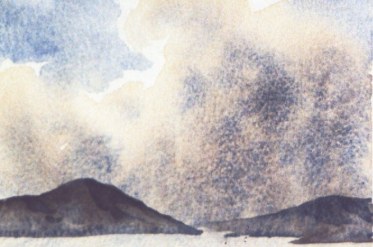
Sky 3 Sky 3
Prepare a mix of Ultramarine a mix of Raw sienna and a mix of Light Red and ultramarine. Mix more paint than you need.
Wet the cloud area with the Raw Sienna and keep the area which is to be blue sky dry. While the cloud area is wet, drop in mixtures of Ultramarine and Light Red where the cloud shadows would form if Light was coming from top left. Vary the mix slightly by adding more Light Red or More Ultramarine until you are happy with the shapes being formed. Don't mess about in the painted area, once it's in leave it alone. Again, while the cloud area is still wet, Paint in the sky with the Ultramarine mix. Where light would hit the edge of the cloud leave a gap between the cloud and sky. In the other areas run the blue of the sky into the cloud area. This will create hard and soft edges respectively. When the sky area is dry, paint in some hills to complete. (See Landscape step by step)
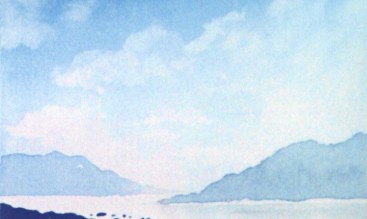
Sky 4 Sky 4
Prepare a mix of Winsor Blue and a mix of Light Red. Mix more paint than you need.
Work with the paper at a slight angle. Paint the sky as in sky 1 above. Working down with Winsor Blue gradually adding more water then adding a little light red near the horizon. Then while the sky is still wet, dab out the clouds with a plug of rolled up tissue. When the tissue is dry it will lift out nearly all the paint and as it gets damp it will lift out progressively less paint so use a dry tissue plug for the top of the clouds and a damp one for the inside and bottom of the clouds. The amount of pressure applied when dabbing also affects the amount of paint which will be lifted so experiment to find the best effects. Add the hills and foreground when the sky is dry. This cloud effect works best with staining pigments as a trace of the original colour is left on the paper giving a more realistic effect.
Self Help: if you are having problems:
If hard lines are being produced in the sky area then the area is not being worked with enough water.
If the colour is not deep enough then more paint needs adding to the mix whilst still keeping it fluid.
Don't forget that the paint, when added to a wet area will be diluted and also it will always dry paler than it looks when its wet - so, if it looks right when wet, it wont be the right tone when it's dry.
If run backs are occurring then the paint in the brush is more watery than the paint on the paper.
When working wet in wet always keep the paint in the brush less watery (slightly thicker) than the paint on the paper. When the gloss goes off the paper it's too dry to apply paint to it to get the soft effects above


