

当我决定做一幅画一匹斑马,我做的第一件事是看看各种参考斑马的照片。我的想法是让一个斑马,定位为饮用水,减少的精华。我的意图是要关注斑马的头,其余的身体和它的位置仅仅是建议,而不是细节。
在画布上绘画了丙烯酸(36 x24”/ 91 x61cm),使用一个调色板仅限于钛白和佩恩尼斯的灰色,与普鲁士蓝,甚至少骨黑。和大多数我的绘画一样,我只用一刷,一个没有。10个大小榛子。
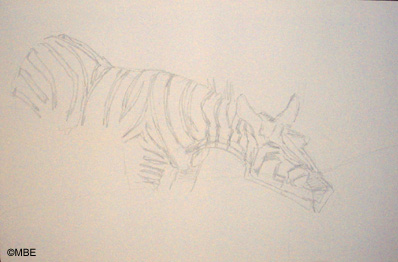
用铅笔,我画的位置斑马直到画布上,注重身体的条纹形式而不是大纲。下一步是开始屏蔽一些油漆。
斑马野生动物画:初始Blocking-In

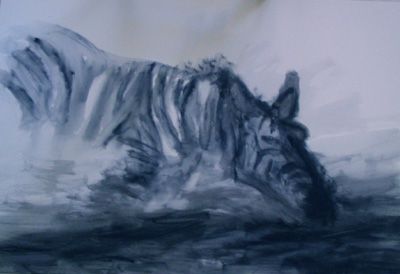
使用薄骨黑,我开始阻止斑马的条纹。看看,即使在这个早期阶段,条纹给斑马的身体结构。不需要一个“大纲”沿着顶部的边缘。用水稀释油漆,我也开始画在水里的。
在这个阶段我的意图是要足够的形状,我可以靠后站,看看作文,看看我很高兴。
斑马野生动物画:定义黑暗
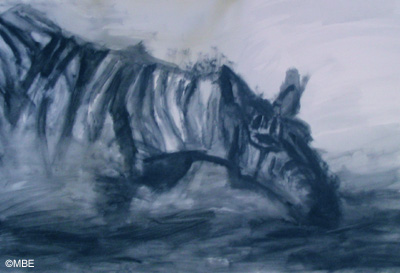
接下来我在黑暗中画三角形,将水斑马是站在喝酒。在一幅画等初期的发展,很重要的是大胆的,不是胆小,黑暗的一部分现在似乎过多或夸张,但仍然有很多画,会发生在其上平静下来。
然后我突然担心也许斑马没有这样做,只能喝从水源避免鳄鱼的边缘。所以我上网有点研究斑马的饮酒习惯,发现他们偶尔涉足更深的水。一样,我不得不改变整个构图。(注意:检查这样的细节之前,我开始画下次!)
斑马野生动物画:检查组成
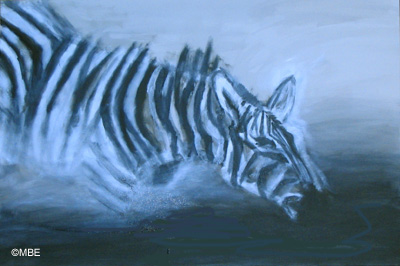
使用佩恩尼斯的灰色,我又在整个组合,重新定义和加强斑马的形状,和水。我还放在一个非常薄釉在右上方地区——你不可能真的看到这照片,因为我不想离开画布光秃秃的。
斑马野生动物画:在白色的工作

后后退一步,看着这幅画,我参考照片有一段时间了,现在我也做了同样的事情再次使用钛白色。在这个阶段我还广泛的工作,尽量不去纠缠于细节直到我满意的基本结构。
斑马野生动物画:添加条纹
(最后)决定我很高兴成分和斑马的底层结构,是时候开始添加一些细节,或者相反,条纹。有条纹的轮廓立即创建一个意义上的形式。相反,如果你不平缓。只是把脖子上的条纹和胃。
我发现自己又画我想什么,而不是什么我参考照片显示。我一直在使条纹的宽度相同,彼此平行。斑马的条纹更多样。时间停下来学习参考的照片!
这也是我的舞台增添了釉普鲁士蓝的在一些地区,特别是水的黑色条纹的斑马,在更薄釉,在上面的“天空”区域。不是蓝色,它只是增加了一个微妙的变化偏暗。
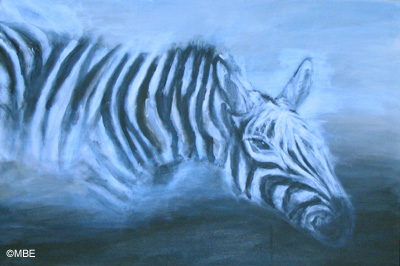
斑马野生动物画:修复的耳朵和眼睛
我精制的条纹,眼睛工作(只是看看那个点不同的光在它使),然后有一个灯泡的时刻!尽管我参考照片在我的面前,我已经画耳朵完全错误的——“内部”。快速刷白色斑马的左耳证实了这一点。再一次我画我的想法,不是我所看到的。
斑马野生动物画:返工
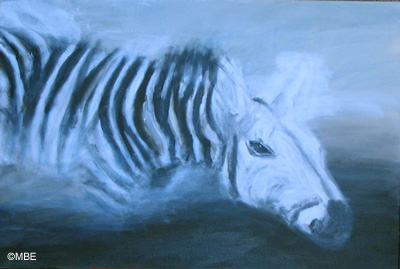
坐在我的工作室看这幅画后一段时间,我决定有三件事真的错了。(1)虽然眼睛是好的,这不是工作面对作为一个整体。(2)身体的脸太小。(3)后面是在太大一个角度的前腿和脖子。
利用钛白我画出的部分,耳朵和脸(眼睛除外),同时扩大它。然后使用佩恩的灰色我涂在鼻子和中线的面前。
退一步看一遍,似乎面对现在身体太大,但因为它的略向观众会有一些透视收缩,所以我需要抵制诱惑,让它小再次在这个阶段。我需要等到我的耳朵大小,然后评估完成。
斑马野生动物画:返工再次面对
我可以把一些照片之间的最后一个和这一个我修改了的脸,但你不需要看到斗争。后,我就爱上了这个“白色刘海”阶段发生鼻子工作,但不是额头。基本上我时而佩恩的灰色和钛白,直到我终于所有的脸和耳朵为我工作。
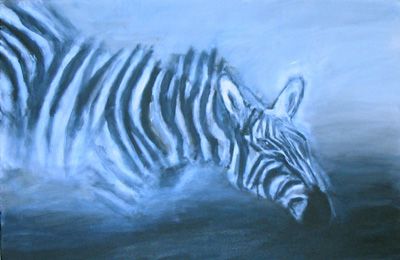
斑马野生动物画:宣布这幅画完了

当我发现自己迅速的解决这一点,我知道是时候停止。还可能不是100%(一幅画能是吗?),但篡改永远不会让它完美,恰恰相反。是时候宣布这幅画完成了,把石头推到一边。我会再看一个星期左右,然后决定是否我仍然认为这是完成。
原文如下:Zebra Wildlife Painting: Starting with a Pencil Sketch
Wildlife Painting Step By Step Demonstration: Zebra Step 1
When I decided to do a painting of a zebra, the first thing I did was to look at various reference photos of zebras. My idea was to have a single zebra, positioned as if it were drinking water, with the scene reduced down to its essence. My intention was for the focus to be on the zebra's head, with the rest of its body and its location merely being suggested, rather than painted in fine detail.
The painting was done in acrylics on canvas (36x24"/91x61cm), using a palette limited to titanium white and Paynes's grey, with a little Prussian blue, and even less bone black. As is the case with most of my paintings, I used only one brush, a no.10 size filbert.
Using a pencil, I sketched the position of the zebra straight onto the canvas, focusing on the stripes that give form to the body rather than drawing an outline. The next step is to start blocking in with some paint.
Zebra Wildlife Painting: Initial Blocking-In
Wildlife Painting Step By Step Demonstration: Zebra Step 2
Using thin bone black, I started block in the stripes on the zebra. See how, even at this early stage, the stripes give structure to the zebra's body. There's no need for an 'outline' edge along the top of its back. Thinning the paint with water, I also started painting in an indication of where the water would be.
My intention at this stage is to get enough shape down that I can stand back and look at the composition to see if I'm happy with it.
Zebra Wildlife Painting: Defining the Dark
Wildlife Painting Step By Step Demonstration: Zebra Step 3
Next I painted in the dark triangle that would be the water the zebra was standing in and drinking from. At such as initial stage in a painting's development, it's important to be bold, not timid; the dark part may seem too much or exaggerated right now, but there's still a lot of painting that'll happen on top of it which will calm it down.
Then I suddenly worried that maybe zebras didn't do this and only ever drank from the edge of a water source to avoid crocodiles. So I surfed around a bit researching zebras' drinking habits and found that they do on occasion wade into deeper water. Just as well, or I'd have had to change the entire composition. (Note to self: Check this kind of detail before I start painting next time!)
Zebra Wildlife Painting: Checking the Composition
Wildlife Painting Step By Step Demonstration: Zebra Step 4
Using Paynes's grey, I went over the whole composition again, redefining and strengthening the shapes of the zebra, and the water. I also put in a very thin glaze in the top right-hand area -- you can't really see this in the photo -- because I didn't want to leave the canvas bare.
Zebra Wildlife Painting: Working Back in With White
Wildlife Painting Step By Step Demonstration: Zebra Step 5
After stepping back and looking at the painting and my reference photos for some time, I now did the same thing again using titanium white. At this stage I'm still working broadly, trying not to get drawn into detail until I'm satisfied with the basic structure.
Zebra Wildlife Painting: Adding Stripes
Wildlife Painting Step By Step Demonstration: Zebra Step 6
Having (finally) decided I was happy with the composition and the underlying structure of the zebra, it was time to start adding some detail or, rather, stripes. Having the stripes to follow the contours immediately creates a sense of form. And, conversely, flattens it out if you don't. Just compare the stripes on the neck with those on the stomach.
Again I found myself painting what I thought, not what my reference photos were showing me. I kept making the stripes identical in width, and parallel to one another. A zebra's stripes are far more varied. Time to stop and study the reference photos!
This is also the stage at which I added a glaze of Prussian blue in a few areas, especially the black stripes on the water's side of the zebra and, in an even thinner glaze, in the 'sky' area above the water. It's not dramatically blue, it just adds a subtle variation to the darks.
Zebra Wildlife Painting: Fixing the Ears (and Eye)
Wildlife Painting Step By Step Demonstration: Zebra Step 7
I refined the stripes, got the eye working (just look what a different that little spot of light in it makes), and then had a lightbulb moment! Despite the fact that I had reference photos in front of me, I'd been painting the ears totally wrong -- 'inside out' as it were. A quick swipe of white on the zebra's left ear confirmed this. Once again I was painting what I thought, not what I saw.
Zebra Wildlife Painting: Reworking the Face
Wildlife Painting Step By Step Demonstration: Zebra Step 8
After sitting across my studio looking at the painting for some time, I decided there were three things really wrong. (1) While the eye was okay, it wasn't working in the face as a whole. (2) The face was too small for the body. (3) The back was going off at too great an angle for the front legs and the neck.
Using titanium white I painted out part of the back and the ears and face (except for the eye), enlarging it at the same time. Then using Payne's grey I painted in the nose and the centre line down the front of the face.
Stepping back to look at it again, it seems the face is now too large for the body, but as it's turned slightly towards the viewer there would be some foreshortening, so I need to resist the temptation to make it smaller again at this stage. I need to wait until I've got the ears done and then reassess the size.
Zebra Wildlife Painting: Reworking the Face Again
Wildlife Painting Step By Step Demonstration: Zebra Step 9
I could've put up several photos between the last one and this one of how I reworked the face, but you don't need to see that struggle. This 'white bangs' stage happened after I got the nose working, but not the forehead. Basically I worked alternately with the Payne's grey and titanium white until I eventually got all of the face and ears working for me.
Zebra Wildlife Painting: Declaring the Painting Finished
Wildlife Painting Step By Step Demonstration: Zebra Step 10
When I found myself 'just quickly' fixing this little bit and that, I knew it was time to stop. It may not be 100 percent yet (can a painting ever be?), but fiddling will never make it perfect, just the opposite. It was time to declare the painting finished and to put it to one side. I'll look at it again in a week or so and decide then whether I still think it's done.


