

变色龙是如此表现性格的生物。除了令人羡慕的能力改变颜色来伪装自己(或压力),他们还得到了眼睛转动(像一个淋浴头)彼此独立的,所以每只眼睛可以在一个不同的方向。
我在花园和在野外遇到他们,尽管它是很难找到一个。(一些物种作为宠物出售,尽管About.com的外来宠物变色龙不要说好的宠物。)
变色龙通常发现树上或大灌木,但我决定画一个游行沿着地面,仿佛在某个任务。我各种参考照片用于绘画,但它是一个“艺术许可证变色龙”不切实际的颜色和复合部分,而不是一个动物学上准确的绘画
阻塞在最初的颜色和形状
我开始用最小的铅笔草图轮廓的变色龙。变色龙的基础的身体或多或少地依赖于在第三行根据构图三分法。然后我封锁在最初的颜色画的三个不同的区域:变色龙,表面上走,和背景。
注意到即使在这个早期阶段我放下漆在后台的方向我想最后画的背景,并从表面区分它变色龙是走路。很难在一幅画的后期隐藏或掩盖刷标志着“错误”,没有完全画在一个区域一个不透明的颜色。
变色龙是画与丙烯酸树脂120 x 160厘米(47 x 63英寸)画布。使用的颜色是:
- 烧棕土
- 镉橙
- 绿金
- 喹吖酮金
这幅画在我的脑海

如果你把这张照片上,你会看到一些定义添加一些送给变色龙的暗色调的身体部位,表面变色龙是站在融入背景。现在似乎是漂浮在空气中。
在我心里我知道,这只是一个简短的一步绘画和它去的地方。但是如果我停止绘画在这一点上多待一段时间,说一夜之间,很可能难以回到这幅画,因为我已经失去了我心灵之眼的视力。选择正确的点是至关重要的中断绘画过程,这样很容易启动。
丑陋的阶段
我的画经常经历我称之为丑陋的阶段。在这里我放下颜色在恶劣或不灵巧的方式准备接下来发生了什么。这是一个舞台,我从不听评论一幅画,因为我知道它仍然是一个半成品,我知道我想做什么。
在这种情况下,暗将画的乐队在所以他们柔和的阴影。只适合眼睛的影子。我知道变色龙是浮动的;我知道口过于简单化,我知道它看起来像有五条腿。我只是等待油漆干燥,然后我会到……
建设性的评价一幅画可以非常有用,但是您需要确保他们在适当的阶段做一幅画的发展。永远记住,这是你的画,你有空或离开其他人的意见。
添加颜色背景
这幅画看起来有点太单色,所以我决定在背景中引入另一种颜色。
为什么是绿色的?好,部分原因是它介绍一些自然的颜色适合这个主题,但最主要的原因是,作为一个类似的颜色(在色轮上相邻的色彩),它能够很好地处理了黄色和橙色。
增加绿色变色龙身体
这张照片显示了整个背景,绿色已经扩展和混合(见以前的图)。更重要的是,它还表明,添加了绿色变色龙本身在几个地方。这有助于把背景和主题在一起,统一绘画中的元素。
如果一幅画的元素不舒适地坐在一起,值得检查你是否使用调色板中的颜色在整个绘画,或在各种独立的地区。如果是后者,有时画釉在整个绘画(使用在这幅画的颜色)有帮助。
完成调色刀

在前面的照片,这之间,我提炼的位置变色龙的腿和尾巴如何加入了身体,并使它似乎走在平坦的表面。这样做都是使用刷子。
一旦背景也完成了,我用画刀添加和完善细节变色龙的身体,腿和尾巴(见细节图)。角是由刀产生身体上的鳞片,更难与刷漆。
现在我只需要画一个小飞挂的画旁边,等猎物变色龙的走向与决心。
原文如下:
Character of a Chameleon
Wildlife Painting Step-by-Step Demo: Chameleon
Chameleons are such characterful creatures. Besides their enviable ability to change color to camouflage themselves (or show stress), they've also got eyes that rotate (like a shower head) independently of one another, so each eye can be looking in a different direction.
I've encountered them in gardens and in the wild, though it can be tricky to find one. (Some species are sold as pets, though About.com's Guide to Exotic Pets says chameleons don't make good pets.)
Chameleons are typically found up a tree or in a large shrub, but I decided to paint one marching along the ground, as if on a mission to somewhere. I used various reference photos for the painting, but it's an "artistic license chameleon" with unrealistic colors and composite parts, rather than a zoologically accurate painting
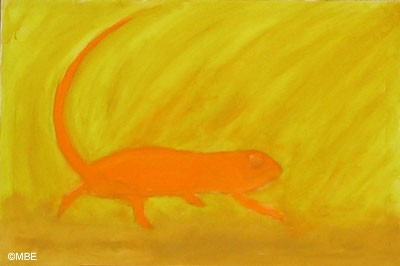
Blocking in the Initial Colors and Shapes
Wildlife Painting Step-by-Step Demo: Chameleon
I started with a minimal pencil sketch for the outline of the chameleon. The base of the body of the chameleon rests more or less on where the third line would be according to the Composition Rule of Thirds. I then blocked in the initial colors of the three distinct areas of the painting: the chameleon, the surface it's walking on, and the background.
Notice how even at this early stage I'm putting down the paint in the background in the direction I want for the background in the final painting, and differentiating it from the surface the chameleon is walking on. It can be difficult at a later stage in a painting to hide or cover up brush marks that go the "wrong way" without totally painting over an area with a very opaque color.
The chameleon was painted with acrylics on a 120 x 160 cm (47 x 63 inch) canvas. The colors used were:
Burnt umber
Cadmium orange
Green gold
Quinacridone gold
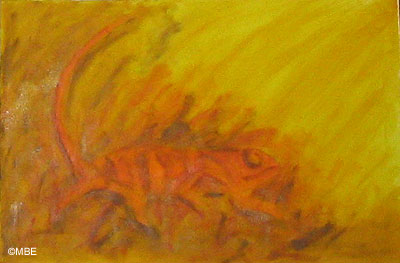
Keeping the Painting in My Mind's Eye
Wildlife Painting Step-by-Step Demo: Chameleon
If you compare this photo to the previous one, you'll see some definition has been given to the chameleon by adding some darker tones to parts of the body and that the surface the chameleon is standing on has blended into the background. Now it appears to be floating in the air.
I know in my mind that this is merely a short step in the painting and where it's going. But if I were to stop painting at this point for an extended period, say overnight, it may well be tricky to get back into the painting because I've lost the vision in my mind's eye. It's crucial to select the right point at which to interrupt the painting process so that it's easy to restart.
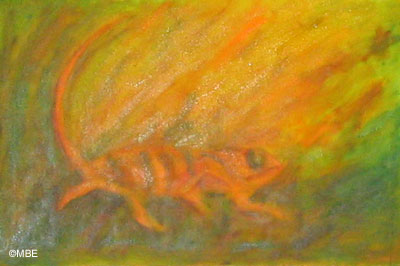
The Ugly Stage
Wildlife Painting Step-by-Step Demo: Chameleon
My paintings often go through what I call The Ugly Stage. It's where I've put down color in a harsh or unsubtle way in preparation for what's going to come next. It's a stage at which I never listen to comments about a painting because I know it's still very much a work-in-progress and I know what I intend to do.
In this instance, the bands of dark are going to be painted over so they're gentle shadows. Only the shadow on the eye is gentle enough. I know the chameleon is floating; I know the mouth is over-simplified; I know it looks like its got five legs. I'm just waiting for the paint to dry and then I'll get onto it...
Constructive comments on a painting can be very helpful, but you need to ensure that they're being made at an appropriate stage in a painting's development. And always remember that it's your painting, you're free to take or leave everyone else's opinion on it.
Adding Color to the Background
The painting was looking a bit too monochromatic, so I decided to introduce another color into the background.
Why green? Well, partly because it introduced a bit of 'natural' color appropriate to the subject, but mostly because, being an analogous color (adjacent on the color wheel), it works well with the yellows and oranges.
Adding Green to the Chameleon Body
Wildlife Painting Step-by-Step Demo: Chameleon
This photo shows how the green has been extended across the background, and blended in (see previous photo). More importantly, it also shows how green has been added to the chameleon itself in a few places. This helps tie the background and subject together, unifying the elements in the painting.
If the elements of a painting aren't sitting together comfortably, it's worth checking whether you've used the colors in your palette across the whole painting, or in various separate areas. If it's the latter, sometimes painting a glaze across the whole painting (using a color that's in the painting) helps.
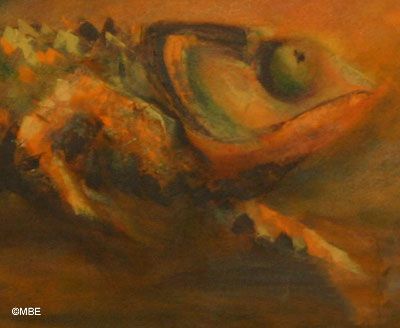
Finishing with a Palette Knife
Wildlife Painting Step-by-Step Demo: Chameleon
Between the previous photo and this, I refined the position of the chameleon's legs and how the tail joined the body, and made it appear to be walking on a flat surface. This was all done working with a brush.
Once the background was also completed, I used a painting knife to add and refine detail on the chameleon's body, legs, and tail (see detail photo). The angular marks made by the knife create a sense of scales on the body that would be much harder to paint with a brush.
Now I just need to paint a small painting of a fly to hang next to this one, as the prey the chameleon's heading for with such determination.


