

这个数字绘画做了部分我的想象力和部分使用照片从一本关于解剖学艺术家供参考。这是在丙烯酸在画布上完成使用普鲁士蓝,佩恩的灰色,镉红、镉黄。只有一个刷使用:一个大公寓,两英寸。我要建立图使用薄釉,所以丙烯酸涂料混合直到非常流体与半水半玻璃介质(确保油漆不会稀释它不会遵循正确帆布)。
建立颜色使用透明釉料出完全不同的效果比使用相当厚的不透明的油漆。这是因为每个新釉或层是受什么影响。很重要当玻璃确保釉是完全干燥之前,否则颜色混合在画布上,你可以得到一个泥泞的结果。
我第一次约了和标记在图画布上用铅笔。然后使用佩恩的灰色,放在图的轮廓和阴影下面的腿以及使用它阻止在头发上。普鲁士蓝的背景了,加上手臂下的阴影和胃。
您将会看到在这一步一步的照片基本形式没有改变我添加各种颜色洗。这是因为我更感兴趣的是捕捉情绪比图绝对准确。
图绘画:蓝军第二步添加红色洗
一旦我做什么在步骤1中已经完全干燥,我添加了镉红釉。虽然我正与丙烯酸树脂干燥迅速,因为我往往是有点不耐烦我用吹风机来加速个过程。另一个选择是两个画布,它们之间交替允许干燥时间。
你会发现有各种各样的“眼泪”的绘画,或油漆的地方跑。这来自使用非常薄釉,加载很多在刷,然后用画笔在画布上压下来所以很多油漆刷在一个小区域。水性颜料在画布上,垂直在画架上。
我决定当我开始绘画,我将离开这个“条纹”时发生,而不是“收拾他们”,我认为这增加了松散的活力,表现主义绘画(尽管有些人讨厌它)。在这幅画的最后阶段,我故意重载这幅画与普鲁士蓝很多这是我认为这增加了这幅画的整体气氛。我还用吹风机吹一些水滴积累下来的油漆画布。
图绘画:蓝色步骤3亮的颜色
在这个步骤中,我添加了一个黄色的釉。看看它是怎么影响层下面的。比较,例如,顶部和中部的大腿。并不是我添加了一个厚的黄色,或超过一层黄色的。下面的颜色黄色的影响。
图绘画:蓝色步骤4添加更多的红色

我决定我真的不喜欢黄色的图,所以添加红层。在这干之前,我“稀释”,在某些领域(如手臂下)通过挤压一些干净的水刷顶部的区域。这画布上跑下来,拿起红色,创造强烈的条纹彩色边缘。
在这个阶段,我认为最好的绘画是腿和脚的一部分。头和手劳累;底部有点“慷慨”的肩膀/颈部一个奇怪的形状。但这幅画的目的是不准确的比例,这是玩釉料和试图传达一种深,深思熟虑的心情。(为什么图没有衣服是一个艺术评论家可能毫无疑问意义解读…但没有意图,至少在意识层面)。
图绘画:蓝调第五步加深颜色
在这最后的三个步骤中,您可以看到这幅画如何改变当我添加越来越多的普鲁士蓝釉,在图和背景。蓝色更深的绘画和红色变为紫色。它还把它变成一幅画与整体凉爽的感觉,而不是如何温暖的感觉在上一步。
图绘画:蓝调第六步提高情绪
我越来越多的“眼泪”油漆添加这个数字是抑郁的感觉,或感觉的蓝色,就像我们说的。我添加了不少的釉彩蓝色,确保每个应用之前是干下一个。
图绘画:蓝调第七步完成的绘画
总的来说,我很满意的感觉我认为这幅画了。尽管有些东西我不喜欢,劳累等地区和一些阴影,是错误的。下次我知道工作初步绘制阴影更仔细。和白出去试图重新开始在任何领域,劳累,因为这样做不能比它已经把事情弄得更糟。他们不工作。
晚上我完成这个,一个朋友来参观,看到它在我的画架。他说的第一句话是:“你为什么垃圾吗?不工作吗?“我最初的反应是防御性的,然后我笑了想它只是证明你喜欢艺术是非常主观的。一个人的“杰作”是另一个的恶梦。
原文如下:
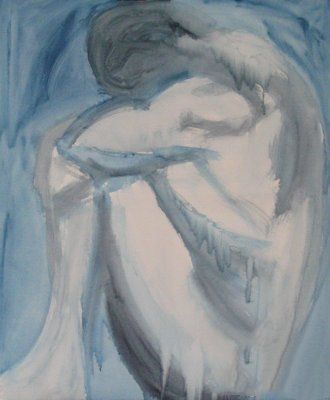
Figure Painting: Blues Step 1 Blocking in Shapes
Figure Painting Step by Step:
This figure painting was done partly from my imagination and partly using a photograph from a book on anatomy for artists for reference. It’s done in acrylics on canvas using Prussian blue, Payne’s grey, cadmium red, and cadmium yellow. Only one brush was used: a large, flat, two-inch brush. I was going to build up the figure using thin glazes, so the acrylic paint was mixed until it was very fluid with half water and half glazing medium (to ensure that the paint would never be so dilute it wouldn’t adhere properly to the canvas).
Building up color using transparent glazes gives quite a different effect than using thickish opaque paint. This is because each new glaze or layer is influenced by what’s gone before. It’s important when glazing to ensure that a glaze is totally dry before adding the next, otherwise the colors mix on the canvas and you get a muddy result.
I first very roughly worked out and marked on the canvas where the figure would fit with a pencil. Then, using Payne’s Grey, put in the outline of the figure and the shadow on the underneath of the leg as well as using it to block in the hair. The background was done with Prussian blue, plus the shadow under the arm and on the stomach.
You’ll see in the photos of this step by step that this basic form didn’t change much as I added the various color washes. This was because I was more interested in capturing a mood than getting the figure absolutely accurate.
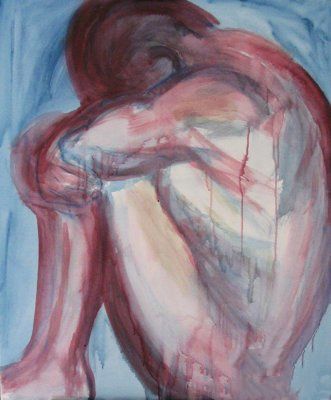
Figure Painting: Blues Step 2 Adding a Red Wash
Figure Painting Step by Step:
Once what I’d done in Step 1 had completely dried, I added a glaze of cadmium red. Even though I was working with acrylics which dry quickly, because I tend to be a bit impatient I used a hair drier to speed up the process. Another option would’ve been to work on two canvases at once, alternating between them to allow drying time.
You’ll see that there are various ‘tear streaks’ in the painting, or places where the paint has run down. This comes from using a very thin glaze, loading a lot onto the brush and then pressing down with the brush on the canvas so a lot of paint comes off the brush in a small area. The watery paint then runs down the canvas, which was vertical on the easel.
I had decided when I started the painting that I would leave the ‘streaks’ when they occurred, rather than ‘tidying them up’, as I think it adds vibrancy to a loose, Expressionist painting (though some people hate it). And in the last stages of the painting I deliberately overloaded the painting with Prussian blue to get lots of this as I think it adds to the overall mood of the painting. I also used the hair dryer to blow some of the droplets of paint that accumulated down the canvas.
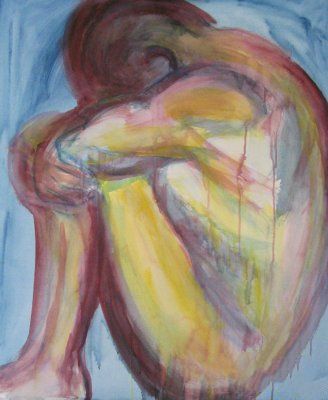
Figure Painting: Blues Step 3 Brightening the Color
Figure Painting Step by Step:
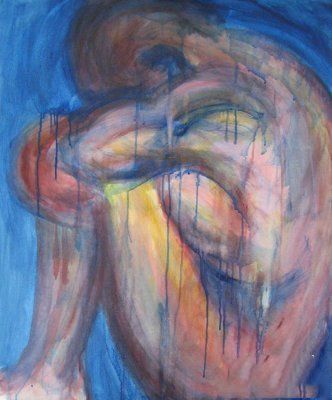
In this step, I added a glaze of yellow. Take a look at how it’s influenced by the layers underneath it. Compare, for instance, the top and ‘middle’ of the thigh. It’s not that I added a thicker yellow here, or more than one layer of yellow. It’s the colour underneath the yellow influencing it.
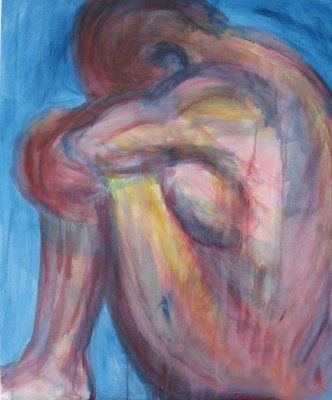
Figure Painting: Blues Step 4 Adding More Red
Figure Painting Step by Step:
I decided I really didn’t like the yellow dominating the figure so much, so added layer of red. Before this had dried, I ‘diluted’ it in some areas (such as under the arm) by squeezing some clean water out of the brush at the top of the area. This ran down the canvas, picking up the red with it, creating the streaks with the strongly colored edges to them.
At this stage, I think the best part of the painting are the legs and feet. The head and hand are overworked; the bottom a bit ‘generous’ the shoulders/neck an odd shape. But the aim of this painting was not accurate proportion, it was to play with glazes and to try and convey a deep, thoughtful mood. (Why the figure doesn’t have clothes on is something an art critic could no doubt read significance into… but there was no intention for there to be, at least on a conscious level.)
Figure Painting: Blues Step 5 Darkening the Colour
Figure Painting Step by Step:
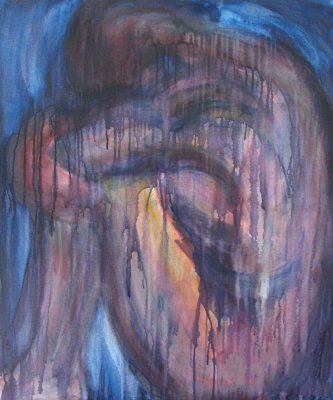
In these final three steps, you can see how the painting changes as I add more and more glazes of Prussian blue, both on the figure and the background. The blue colour darkens the painting and turns the red into a purple. It also turns it into a painting with an overall cool feeling, as opposed to how warm it felt in the previous step.
Figure Painting: Blues Step 6 Enhancing the Mood
Figure Painting Step by Step:
To me the increasing number of ‘tear streaks’ of paint add to the feeling that the figure is depressed, or feeling blue, as we say. I added quite a few glazes of blue, ensuring each was dry before applying the next.
Figure Painting: Blues Step 7 The Finished Painting
Figure Painting Step by Step:
Overall I was pleased with the feeling I think this painting conveys. Even though there are things about it I don’t like, such as the overworked areas and some shadows that are wrong. Next time I know to work out the shadows more carefully in a preliminary drawing. And to white out and try to start again on any areas that are overworked, because doing so can’t make it any worse than it already is. They’re not working anyway.
The evening I finished this, a friend came to visit and saw it on my easel. His first words were: “Why did you muck it up? Wasn’t it working?” My initial response was to be defensive, then I laughed thinking it just proves that what you like in art is very subjective. One person’s “masterpiece” is another’s idea of a nightmare.


