在这个阶段的绘画,绘画的问题,退一步和评估,然后再次返工。我工作快,使用薄釉丙烯酸来建立一个“有趣的白色”表面上看比赛的身体。
眼睛已经修改了略,延长睫毛和添加一个白色光芒。注意一点建议的另一只眼睛是黑色的睫毛。它还帮助创建一个意义上的形式的脸(用你的手指,你会看到脸看起来平)。
脸上仍然缺少的是一个小的橙色,应用作为一个非常薄釉在选定的地方,并不是所有的结束。但它必须完全干燥之前,这是补充道,所以橙色不与白色混合。
这幅画完成了吗?
我在面临一些精致的细节(特别是耳朵),然后把它一夜之间。第二天,我发现自己摆弄,“很快我就……”模式,你尝试修复部分并不完全正确,但真的不做任何有益的这幅画整体。所以我决定离开这幅画,不管它看起来像一个白马没有鬃毛或没有条纹的斑马。一个朋友告诉我这幅画是“所有马的精神,过去和现在。“我会回来的几周,然后决定如何处理它,如果有的话。
橙色的错误还在腿上,就像蓝色的肩膀/颈部,但他们不要烦我。他们添加松动的感觉(或粗糙度)的身体与头部更顺畅、更好的完成。
再次有事情我真的很喜欢这幅画,我会做的事情不同。开始一个新的绘画……为艺术和恐惧说:“种子为您的下一个艺术作品是嵌入到当前块的不完美。”
原文如下:
Starting with Specific Intentions
I like to let a painting evolve as I paint it, rather than planning everything out in detail before I start. This is not to say that I start painting without an idea of what I'm trying to do; rather it's that I don't stick to it rigorously as I go along if I find that something else is working.
When I started this painting, I intended it to be a follow-up painting to this painting of a zebra. Since I'd declared that painting finished, my mind had been pondering on other things I might have done with it. I also wanted to try quite a different background, one with a feeling of the sun baking the ground. But what had been intended to be the underpainting turned into an intriguing glazed white that I found myself wanting to keep, rather than hiding under zebra stripes. So then the question became, could a zebra become a horse?
The painting was done using acrylic paints on canvas (36x24" / 91x61cm). The colors used were titanium white, titanium buff, cadmium orange, transparent pyrrole orange, cerulean blue, Prussian blue, and bone black. The brush I used was my favorite bristle-hair filbert.
Reusing an Old Canvas
I reused an old canvas for the painting. As I was intending it to be a study rather than a 'masterpiece' I didn't bother to obliterate what had been painted on it before (hence the strange background in the top half of the photo). When you paint over an old painting you run the risk that what was underneath will show through, either as texture, or as color if you're using transparent colors or glazing.
Using titanium white I blocked in the main shape of the animal, then reached for Prussian blue for the background. If you compare the composition to that of the previous zebra painting, you'll see that although the position is the same, there's less of the body and legs showing.
Deciding on the Painting's Composition
Painting horses step by step demonstration
My initial thought in terms of composition was to have loads of sky and little foreground, and this was blocked in using Prussian blue and titanium buff. I've also used some of the blue on the body, establishing the shadow area on the neck and chest, and marking where the ear and eye will be.
At this early stage in the painting I've established where the main shapes in the painting will be. Stepping back to look at it, I decide the foreground aligns awkwardly with the stomach, and that if I take it higher, it runs the risk of cutting the painting in half or making another awkward alignment with the neck. So that will have to be changed...
Changing the Painting's Composition
Painting horses step by step demonstration
As you can see if you compare this photo to the previous one, the background of the composition has changed totally, with the foreground now dominant and the sky reduced to about a third. Though the composition doesn't follow the rule of thirds in terms of position of the animal's head, I'm happy with it as the body on the left is very 'heavy' and the space on the right gives a feeling of space for the animal to be looking into.
What's that strange band of orange on the legs I hear you ask? A moment's lost concentration, when I was painting the orange and painted over the leg. It dried before I thought to wipe it off and, being acrylics, then it was too late! You'll see in subsequent steps how I glaze over it, but it never totally disappears. Of course I could've painted over it with titanium white or buff straight from the tube, which are both very opaque colors. But I didn't want to as some interesting color had already been building up by my brushing some of the last remains of the orange onto the body.
Focusing on the Head
Painting horses step by step demonstration
Having established the background and the main body shapes, my next step was to paint some more detail on the head. Using titanium buff I refined the shape of the head more. Then, using titanium white, I marked where the ears would be, the eye, and the top of the nose.
It's not very much in terms of quantity of paint put down, but the animal immediately 'reads' more real, like a horse rather than a sort-of-horse-like shape. There's one problem with the composition though, the tip of the one ear is touching where the land and sky meet, breaking the "No Kissing" painting composition rule.
Help, It's All Gone Flat
Painting horses step by step demonstration
The painting as it is in this photo is an ugly mess, the face is flat and two-dimensional. But it was only like this very briefly, when I put in the black for the nose, insides of the ears, and drew the black stripe down down the face to show myself where the turn on the face should be. I try never to stop at this stage in a painting because it would be like stopping in the middle of a thought.
If you compare this photo to the previous one, you'll see that the 'kissing' of the ear has also been resolved.
Guide the Viewer's Eye with Directional Brush Marks
Painting horses step by step demonstration
It's still not looking pretty... it's gone all gray and dull. But pretty is not the point of taking a photo of this stage. Rather it's to show how using direction with your brush strokes helps create form, or a sense of volume in the face.
The brush strokes on the nose go down the length of it, drawing the viewer's eye along. Notice how these long brush marks stop at the line I painted in at the previous stage, while the brush marks under the eye going in quite a different direction.
Do you see how having the two different directions in brush marks makes the viewer's eye interpret it as having a curve in the shape, rather than it being flat? The brush marks under the eye are very crude at the moment, but even when they're less obvious and the colors blended, they'll still guide the viewer's eye.
Adding White to the Face
Painting horses step by step demonstration
While the form of the face is beginning to take shape, it's become too gray, so I went back to painting with pure titanium white. It's an opaque color, but used thinly as a glaze does allow what's underneath to come through.
Rework, Assess, Rework
Painting horses step by step demonstration
At this stage in painting, it's a question of painting, stepping back and assessing, and then reworking again. I'm working fast, using thin glazes of acrylic to build up an 'interesting white' on the face to match that of the body.
The eye has been reworked slightly, lengthening the eyelashes and adding a white sparkle in it. Note how the other eye is suggested by a tiny bit of black eyelash. It also helps create a sense of the form of the face (cover it with your finger and you'll see the face looks flatter).
What the face still lacks is a tiny bit of the orange in it, applied as a very thin glaze in selected places, not all over. But it must be totally dry before this is added, so the orange doesn't mix with the white.
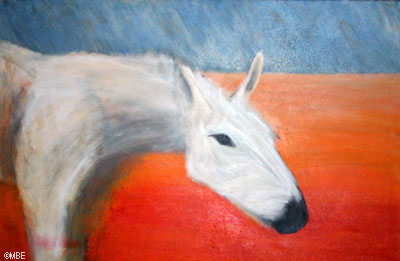
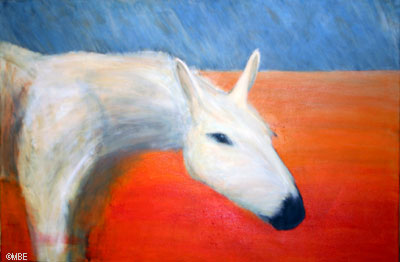
Is the Painting Finished?
Painting horses step by step demonstration
I refined the detail on the face some more (especially the ears), then left it overnight. The next day I found myself fiddling, that "I'll just quickly..." mode where you try to fix bits that aren't quite right but really aren't doing anything beneficial to the painting overall. So I decided to leave the painting as it is, regardless of whether it looks like a white horse without a mane or a zebra without stripes. One friend told me the painting is "just the spirit of all equines, past and present." I'll come back to it in a few weeks and decide then what to do with it, if anything.
That orange mistake is still there on the leg, as is the blue one on the shoulder/neck, but they don't bother me. They add to the feeling of looseness (or roughness) on the body which contrasts with the more smoother and finer finish to the head.
Once again there are things I really like about the painting and things I would do differently. Time to start a new painting... As Art and Fear says: "The seed for your next art work lies embedded in the imperfections of your current piece."