

英格兰——水彩画技术由罗兰·李
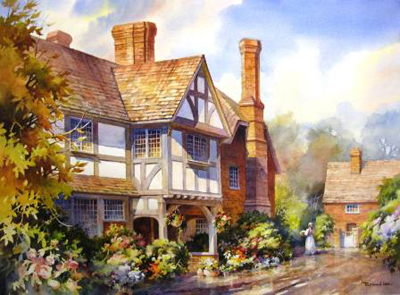
我已经有点艺术授权这个场景,我经常做的。我认为镇上的居民纵然在肯特郡英格兰会认出这个地方虽然。我们开车经过这个酒馆在路上从酒店Edenbridge纵然经常。这也是捡点伊甸谷步行小道,我接手到Chiddingston城堡。
点击信息在采购这幅画

我做了这个草图的亨利八世酒店和客栈在小镇的纵然在肯特郡英格兰。这幅素描的绘画灵感”村的肯特”所示。我们只花了一个星期在这个区域,但我没有麻烦填充一个速写本图纸。
看到所有的随笔集图纸的英格兰肯特
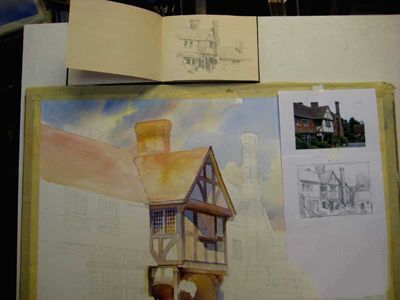
1。使用随笔集图纸完成位置在英格兰,连同我的数码照片,我工作为我的画出设计在一个小“缩略图”价值的研究。一点额外的时间花在这一点上,制定一个路线图,这幅画将会节省时间以后的头痛。左边的图片展示了我如何工作,录音的参考材料,我的板,这样就能指的是我去。这是一个相当标准的程序对我来说。所有这些准备工作完成,和我的资料,我可以自信地附近开始实际的绘画。
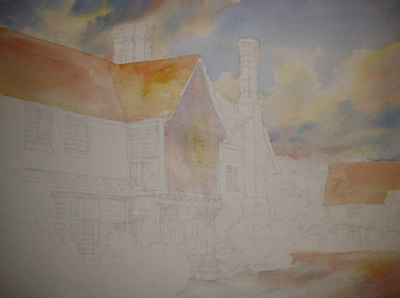
2。我的绘画表面是140磅。拱门水彩冷压纸。它是浸泡在浴缸里然后钉在一个硬垫板。当干燥,我申请遮蔽胶带边缘给一个简洁的框架边缘画。我经常使用300磅。拱门的大画,但在这种情况下我是不重的纸。我喜欢140磅无妨但是它不保存水分,长所以我得油漆更迅速。
使用4 h铅笔我勾勒出这幅画用灯线,这将被应用时的油漆。如果一个小铅笔显示通过在光领域我将取消这个时候捏橡皮当绘画是完整的。我花了很多时间调整图纸和让它正确的在这一点上。我想画好是我最大的力量和毫无疑问在写实主义绘画是非常基础的好画。让提款权有时带我一整天,但肯定能让其余的工艺流程简单。
一如既往的我开始绘画过程与最轻洗。我没有太注意这一点,所以我让颜料混合和流动共同创建纹理。天空是通过使用一个湿的湿技术,润湿表面第一,和滴颜料到它。这将创建软边的云彩。
3。现在我试图抓住温暖和凉爽的感觉通过在兴趣中心。你能看到我的价值关系的建立darket深色和轻的灯光在这一点上。对比这一地区前必须更大(深色暗对轻的灯)和后方远处一定少由于天线角度对比。请注意蓝色的投射阴影看起来在前面的窗口。一旦暗了的蓝色看起来就不会那么强烈(看到完成的画)。核心阴影一般热情由于反射光而投下的阴影是冷却器,捡蓝色从天空。

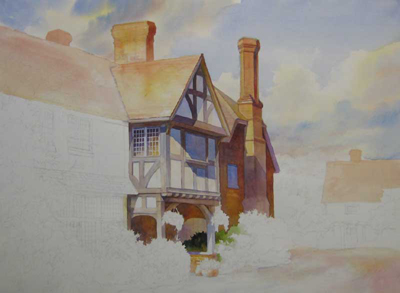
4。好吧,现在我已经进入后台定义最黑暗的黑暗在遥远的树木,将永远不会像黑暗作为前景。通过使用光釉料和湿在湿我创造假象,树木在远处。这给深度在绘画。与远处的树木建立,我搬回兴趣中心和定义鲜花和灌木在前门。现在我有一个很好的感觉的价值关系和相信这幅画是朝着正确的方向前进。
我用消极的绘画aorund前台离开所以我可以用较浅的颜色有。在我的价值的研究在一个图里画的,我前面的遥远的建筑。我故意把那个区域光所以我可以刷图更轻。现在我素描图中,并决定,这将是一个女人在时期服装carrrying一篮子东西。我小心地将她从太阳发出的光会落在她和影子从酒馆将sillhouette她好。记得用水彩总是“光与暗——保护白人!。“不过,如果你把太多的白色会扭曲你的判断当躺在其他值。所以我更好的开始工作的前景和得到一些东西放在那里太。
5。把这幅画完成需要更多的工作时间一样多——可能整个画了这一点。所有的树叶和花朵都是前景画使用背画或消极的绘画创造更轻的形状画周围的黑暗。我选择不使用任何掩蔽保护灯虽然没有错,过程。我只是觉得这样很烦去惹它。
注意,我已经创建了一个有趣的图案的灯光和感光街和扔在一些反光的戏剧。这是一个相对复杂的绘画,但最难的是位置,规划的研究成果与研究这幅画缩略图,得到轮廓图就在我甚至拿起画笔。毕竟,实际的绘画过程是一件轻而易举的事。我可以打开音乐和工作在自动驾驶仪。当然,你总是遇到不少障碍作为绘画的进展,但与前面仔细的规划,走的更顺畅。
这就是它!我将把画放在画架上在我的工作室一个星期左右去寻找任何问题。我总是有我的摄影师,弗兰克·卡特,拍些35毫米幻灯片和几个4 x 5颜色透明之前我发送paintnig去筹划者。这样,一旦画出售,我还有图像为杂志文章、卡片、打印、归档的目的。
原文如下:
Step by Step Watercolor Painting Demonstration
Village in Kent, England - Watercolor Painting Techniques by Roland Lee
I've taken a little artistic license with this scene, as I so often do. I think residents of the town of Hever in Kent England would recognize the place though. We drove past this tavern on the road from Hever Hotel to Edenbridge often. This was also the pick up point for the Eden Valley walking trail which I took over to Chiddingston Castle.
Click for information on purchasing this painting
I did this sketch of the King Henry VIII Inn and Tavern in the little town of Hever, In Kent England. This sketch inspired the painting "Village of Kent" shown below. We only spent a week in this area, but I had no trouble filling a sketchbook with drawings.
See all the sketchbook drawings of Kent England
1. Using the sketchbook drawing done on location in England, along with my digital photo, I work out the design for my painting in a little "thumbnail' value study. A little extra time spent at this point, working out a road map for the painting will save hours of headache later on. The photo at left shows how I work, taping the reference material to my board so I can refer to it as I go. this is a pretty standard procedure for me. With all of this prep work done, and my reference material nearby, I can confidently begin the actual painting.
2. My painting surface is 140lb. Arches watercolor cold-press paper. It is soaked in the tub then stapled to a stiff backing board. When dry, I apply masking tape around the edges to give a nice clean framing edge on the painting. I often use 300 lb. Arches for big paintings, but in this case I was out of the heavier paper. I like 140 lb. just as well however it doesn't hold moisture as long so I've got to paint more quickly.
Using a 4H pencil I sketch out the painting using light lines, which will be obliterated by the paint when it is applied. If a little pencil shows through in light areas I will lift it off with a kneaded eraser when the painting is complete. I spend a lot of time adjusting the drawing and getting it right at this point. I think drawing well is my biggest strength and there's no question in realist painting it is the very foundation of good painting. Getting the drawing right sometimes takes me a whole day, but it sure makes the rest of the process flow easier.
As always I begin the painting process with the lightest washes. I don't have to be too careful at this point, so I let the pigments mingle and flow together to create texture.The sky is done using a wet-in-wet technique, wetting the surface first, and dropping pigments into it. This creates the soft edges of the clouds.
3. Now I try to catch the feeling of warm versus cool by working in the center of interest. You can see I am establishing the value relationship of darket darks and lightest lights at this point. the contrast in front of this area must be greater (darker darks against lightest lights) and the distance behind must have less contrast due to aerial perspective. Notice how blue the cast shadow looks on the front window. Once the darks are laid in the blue won't seem so strong (see the finished painting). Core shadows are usually warm due to reflected light while cast shadows are cooler, picking up the blue from the sky.
4. Okay, now I have to move into the background to define the darkest darks in the distant trees which will never be as dark as the foreground. By using light glazes and wet-in-wet I create the illusion that the trees are off in the distance. This gives depth in the painting. With the distant trees established, I move back to the center of interest and define the flowers and shrubs around the front door. Now I have a pretty good feel for the value relationships and feel confident that the painting is moving in the right direction.
I am using negative painting aorund the foreground leaves so I can use lighter colors there. In my value study I sketched in a figure in front of the distant building. I purposely left that area light so I could paint the figure lighter. Now I sketch in the figure, and decide that it will be a woman in period costume carrrying a basket of something. I carefully place her so the light from the sun will fall on her and the shadow from the tavern will sillhouette her nicely. Remember with watercolor it's always "light against dark--preserve the whites!." However, if you leave too much white it will distort your judgement when laying in the other values. So I better get to work on the foreground and get something laid in there too.
5. Bringing the painting to completion requires a lot more work -- probably as much time as the whole painting up to this point. All of the foreground tree leaves and flowers are painted using back-painting or negative painting creating the lighter shapes by painting the darks around them. I choose not to use any masking to preserve the lights although there is nothing wrong with that process. I just find it annoying to mess with it.
Notice that I have created an interesting pattern of lights and darks in the street and throw in some reflections for drama. This is a relatively complicated painting, but the hardest part was the research done on location, planning the painting with thumbnail studies, and getting the outline drawing right before I even picked up the brush. After all that, the actual painting process is a cakewalk. I can turn on the music and work on auto pilot. Of course you always hit a few roadblocks as the painting progresses, but with careful planning up front it goes much smoother.
So that's it! I will keep the painting on an easel in my studio for a week or so to look for any problems. I always have my photographer, Frank Carter, shoot some 35 mm slides and several 4 x 5 color transparencies before I send the paintnig off to the framer. That way, once the painting is sold, I still have the image for magazine articles, cards, prints, and archival purposes.


