我爱分享这种自发的经验在水彩。
这甜蜜的脸属于我和Harmoni了为自己画像,她的第一个生日。本文使用的是33. Canson gms。一个可爱的表面细节和一个好的重量防止屈曲。12号和4紫貂刷是我的选择。

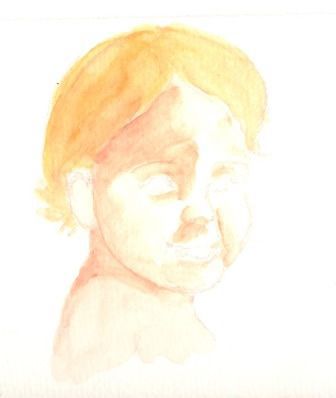
步骤1。素描的特性与光红色铅笔水彩画。
步骤2。一个洗的深褐色是用于建立阴影。
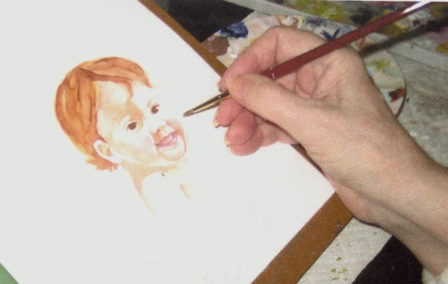
步骤3。金红色的头发被冲进。提示:尽量保持刷在一个轻松的方式在示例2。

步骤4。肉是画在脸上的音调和脸颊的色彩,朱红色的是然后放到,仍然使用相同的笔刷。
步骤5。眼睛是漆成棕色,没有4刷,睫毛建立了具有一个深棕色的语气。提示:不要漆个人睫毛。
步骤6。仍然使用4号刷嘴画着朱红色。一些更深的音调被漆成棕色的头发加上深褐色。
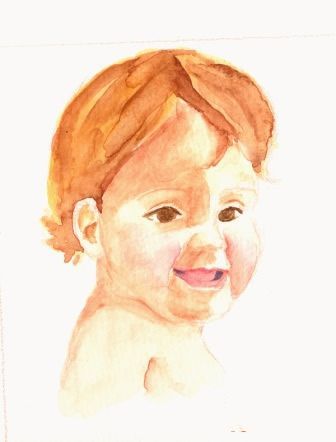
步骤7。决策决定……。我不确定是否要离开洗在流畅的技术…看到示例3:

然后我决定运用一些肉加上白色到打火机区域的脸;这种混合阴影的边缘,形成了一些中间色调。与4号刷和白色然后我建立了反射光的一边的脸和一些突出的脸颊、下巴、鼻子和上唇。亮点在唇上,舌头和眼睛上画起画笔。
步骤8。金黄色加白色是用来染头发的虽然有些布朗表示暗色调和卷须。布朗加上蓝色用于眼睛的瞳孔,嘴角,鼻孔。
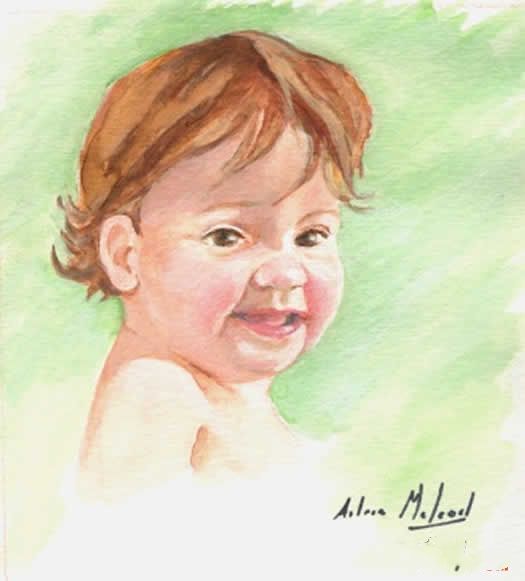
步骤9。使用没有12刷我洗白色背景,这给了“牙齿”的纸。然后我画永久绿色与快速行程覆盖整个纸,把它的头发和脸线。当背景是干燥头发的触角被夸张了。看到样品4。

第10步。时间检查和我注意到脸颊只是一点点太饱所以我混Permant绿色加上白色和0 4刷我,走到一边的脸颊和画在背景。我也拍了一些从顶部的头发。
步骤11。阴影是加深了一侧的脸。一个被涂掉的黄土洗头发。绿色的背景是继续顶部和侧面的纸,洗的黄色这里和那里。这幅画有一个自发的出现,正是我要达到的目标。我希望你享受你的“自然体验“当你使用这种技术。

原文如下:
I love to share this SPONTANEOUS EXPERIENCE in WATER COLOUR.
This sweet face belongs to Harmoni and I was drawn to paint her portrait for her first birthday. The paper used was Canson 33.gms. a lovely surface for detail and a good weight to prevent buckling. No. 12 and 4 sable brush was my choice.
STEP 1. Sketch the features with a Light Red aquarelle pencil.
STEP 2. A wash of Burnt Sienna was used to establish the shadows.
STEP 3. Golden Red was washed into the hair.HINT: Try to hold the brush in a relaxed manner as in sample 2.
STEP 4. Flesh was painted in for the face tones and the cheek colour, Vermillion was then placed in, still using the same brush.
STEP 5. The eyes were painted in Brown with No 4 brush and the eyelashes were established with a Dark Brown tone. HINT: Do not paint the individual lashes.
STEP 6. Still using the No 4 brush the mouth is painted with Vermillion. some deeper tones were painted into the hair with Brown plus Burnt Sienna.
STEP 7. Decisions….decisions….I was not sure whether to leave the washes in the free-flowing technique…see sample 3:
I then decided to apply some Flesh plus White into the lighter areas of the face; this blended the edges of the shadows and formed some middle tones. With a No 4 brush and White I then established the reflected light on the side of the face and some highlights on the cheek, chin, nose and upper lip. The highlights on the lip, tongue and the eyes were painted in with the tip of the brush.
STEP 8. Golden Brown plus White was used for the highlights of the hair while some Brown indicated darker tones and tendrils. Brown plus Blue was used for the pupils of the eyes, corners of the mouth, and the nostrils.
STEP 9. Using a No 12 brush I washed White over the background, this gave “tooth” to the paper. I then painted Permanent Green with quick stroke coverage across the paper, taking it up to the hair and the face line. When the background was dry the tendrils of the hair were exaggerated. See sample 4.
STEP 10. Time for checking and I notice the cheek is just a tiny bit too full so I mix Permant Green plus White and with N0 4 brush I came up to the side of the cheeks and painted in the background. I also took some off the top of the hair.
STEP 11. The shadows were deepened on the side of the face. a Sienna wash was painted over the hair. The Green background was continued to the top and sides of the paper, with a wash of Yellow here and there. This painting has a spontaneous appearance and that is exactly what I set out to achieve. I hope you enjoy your “Spontaneous Experience” when you use this technique.


