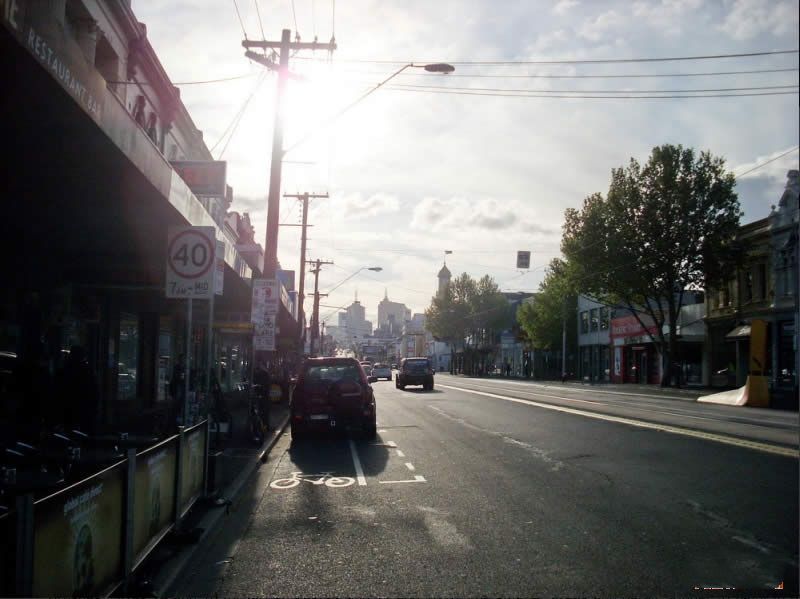
所需材料
拱门300 gsm粗糙水彩画纸
画笔:尺寸24和16大洗和12和10对较小的区域和细节。装配工画在电线。
油漆:所有温莎和牛顿-钴蓝色、镉橙、法国的深蓝色,深褐色,暗红的主要颜色。
底板、胶带、旧毛巾来控制你的画笔,湿润
第一步
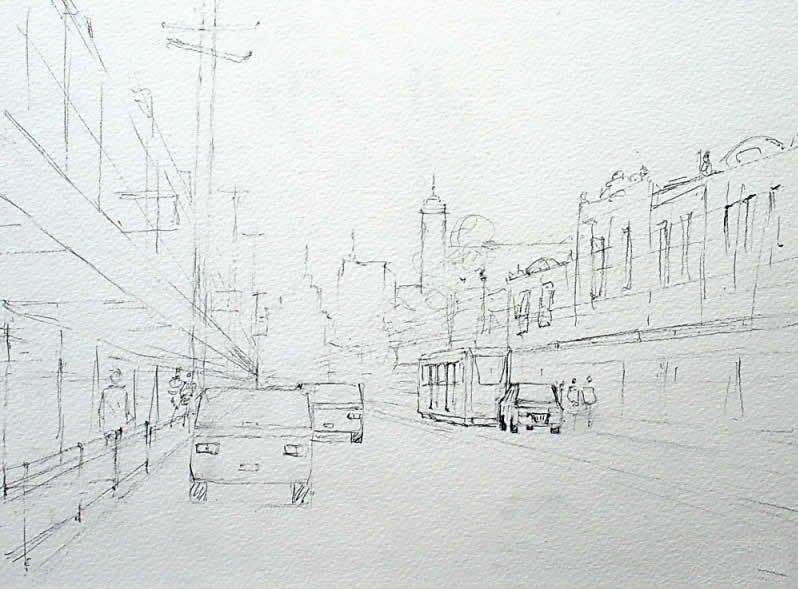
做一个详细的图纸的这一幕。街景的关键这样做首先视线水平,然后构建其他场景从那里。我的意思是,如果你把在眼睛水平,有效地告诉你,那里的气氛会如果你有一个,因此,一般的消失点对你的街道会(显然这将是一个更复杂的问题,如果这是一个多山的场景,但将不得不等到稍后演示)。
画一条线穿过板在眼睛水平,然后调整从那里。先画一个人,在这种情况下,一个在底部左边的这幅画。然后把车靠近他。考虑汽车的比例的人,这个人的天幕以上等,当进行绘图。用这种方法,所有事情都应该像它适合在一起。我将做一个未来的演示关于如何画一个街道。
注意在图下面,我调整我觉得添加到总体设计的图像如。我把电车和汽车在路的另一侧,使道路有点窄。我删除了一些树木的右边和简化了那里的建筑。当我做这样一幅画我不坚持完全的是什么照片或现场在我面前当绘画从生活。如果我想要一个图像与一切是那么我不妨就架我的照片。相反我做出调整,我觉得会给消息我想传达用最少的笔触和绘图。在这种情况下我想展示的是日落与人毫无疑问在他们回家的路上,经过几天的工作!
步骤2
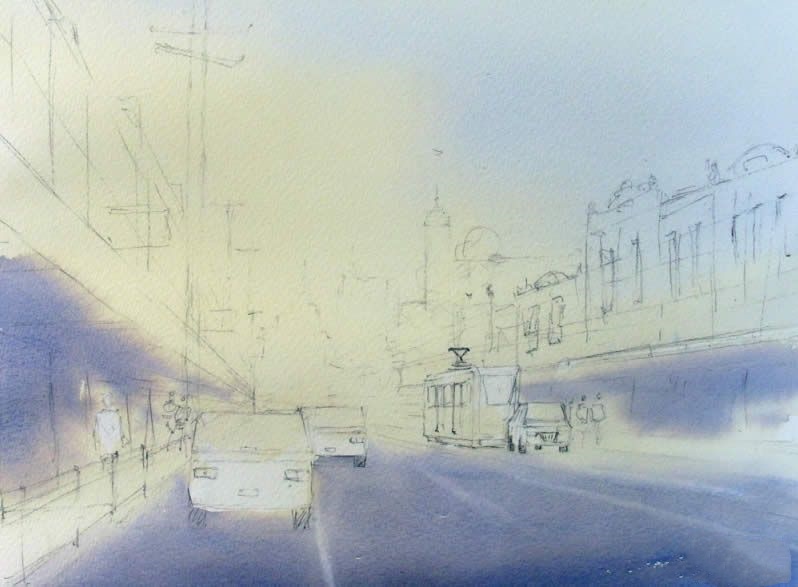
在您满意的图纸你会做你的第一个洗。我让,很苍白,单独的混合的钴蓝色,然后另一个Cad橙色。这些将进入天空如图3所示。我也使用一个混合的法国深蓝色,大红和一点点的深褐色的路面。
我先躺下来洗的Cad橙色(记得这一定很苍白,否则将失去其透明度)和钴蓝色的天。这些洗超过建筑区域图像。这在冲刷着建筑将作为以后的寒冷和温暖的强调在绘画。
确保天空洗有很多水,让Cad橙色混合珠顶部的遥远的路面。他们把在路上洗。在这种情况下你想创建一个分级从远处洗光强音调在前台。此外,Cad橙色珠应该流进路和创建一个更轻的部分将提高距离效应。
放弃一些道路的混合物在遮阳棚下充当洗的阴影存在。
离开这个完全干燥。
步骤3
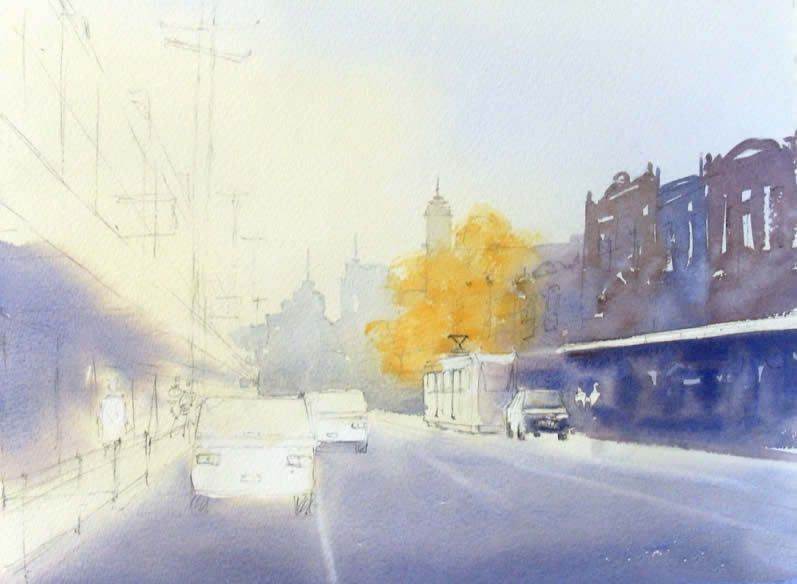
我们现在将油漆建筑右边的这一幕。
使远距离的很轻,不如此不同的色彩倾向于蓝灰色(例如。钴蓝色有点深褐色,然后为你走向边缘的纸添加更多的色素来强化混合和温暖的和温暖的颜色(深褐色,法国深蓝色(代替钴蓝色),暗红。保持你的颜色不同。这棵树是画使用Cad橙色。富有表现力的笔触与快速离开建筑物上突出近暗示windows和高点燃的部分墙壁。
我画在天幕与法国深蓝色,大红和深褐色倾向于蓝色。我离开这里也最精彩的部分。
我运行的一些建筑色彩成车的前部和电车来连接它们与更大的形状。
步骤4
接下来我们油漆建筑左边。
从一个强大的组合的法国深蓝色,深褐色和一些暗红的上面部分的天幕,然后减轻(通过添加更多的水)和酷(通过添加更多的蓝色)当你走向遥远的部分场景。在第一次离开高光和尖锐的边缘,然后软化这些边缘向距离。
遮篷下精益颜色更向蓝可以看到在图5。离开未上漆的区域印象的windows,标志和桌面。油漆在数据如果你能。
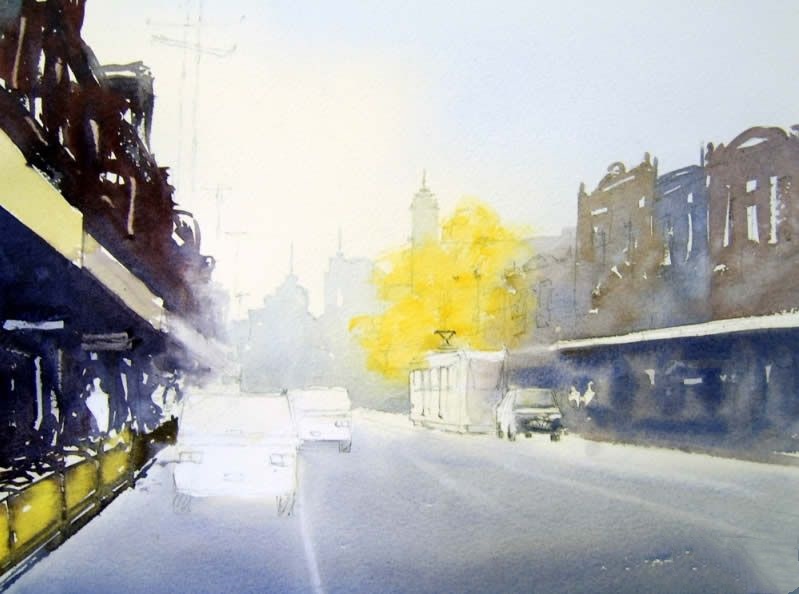
步骤5
绘画的灯柱,汽车和电车来下一个。记住光从哪里来,因为这将告诉你这部分的每个对象将重量比,这将是黑暗的。确保对象,更靠近前台更强了语气,那些在远处。我使用一个淡绿色的颜色的电车。
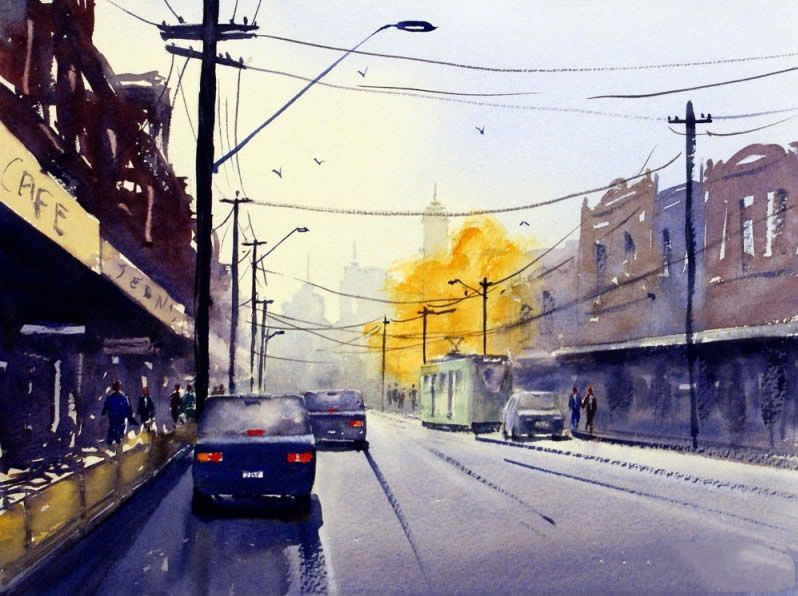
我们现在可以完成这幅画做数据(再一次更详细和更强的音调的数字接近观众),阴影在汽车和电车以及纹理和阴影在路面上。
我还添加了更多的颜色的树(更多的Cad橙色)。
完成与标牌、电线、鸟等。
快乐的画!
乔·卡特赖特
原文如下:
Required Materials
Arches 300gsm Rough Watercolour Paper
Brushes: Sizes 24 and 16 for larger washes and 12 and 10 for the smaller areas and detail. Rigger to paint in the power lines.
Paints: All Winsor and Newton – Cobalt Blue, Cadmium Orange, French Ultramarine, Burnt Sienna, Alizarin Crimson are the main colors.
Backing board, masking tape, old towel to control wetness of your brushes.
Step One
Do a detailed drawing of this scene. The key to doing street scenes like this is to start with eye level and then build the rest of the scene from there. What I mean by this is that if you put in eye level that effectively tells you where the horizon would be if you had one and hence where the general vanishing point for your street would be (obviously this would be a lot more complicated if this was a hilly scene but that will have to wait till a later demonstration).
Draw a line across the sheet at eye level and then adjust everything from there. Start by drawing a person, in this case the one on the bottom left hand side of the painting. Then draw the car near him. Think about the proportions of the car to the man, the man to the awning above in etc, when doing the drawing. In this way everything should look like it fits together. I will be doing a future demonstration on just how to draw a street scene.
Notice in the drawing below that I made adjustments I felt added to the overall design of the image e.g. I put in the tram and car on the other side of the road and made the road a little narrower. I removed some of the trees on the right hand side and simplified the buildings there. When I do a painting like this I do not stick completely to what is in the photograph or the scene in front of me when painting from life. If I want an image with everything in it as is then I might as well just frame my photograph. Instead I make adjustments which I feel will give the message I want to convey with a minimum of brush strokes and drawing. In this case I wanted to show the sunset with people no doubt on their way home after a days work!
Step 2
After you are happy with the drawing you will do your first wash. I make, very pale, separate mixes of Cobalt Blue and then another of Cad Orange. These will go into the sky as in Figure 3. I also use a mix of French Ultramarine, Alizarin Crimson and a touch of Burnt Sienna for the road surface.
I start by laying down the wash of Cad Orange (remember this must be very pale or it will lose its transparency) and Cobalt Blue in the sky. These washes go over the building areas as in the image. This under wash over the buildings will act as the cool and warm highlights later in the painting.
Make sure the sky washes have lots of water in them and let the Cad Orange mix bead at the top of the distant road surface. They put in the road wash. In this case you want to create a graded wash from light in the distance to strong tones in the foreground. Furthermore the Cad Orange bead should flow into the road and create a lighter section which will enhance the distance effect.
Drop some of the road mixture under the awnings to act as an under wash for the shadows there.
Leave this to dry thoroughly.
STEP 3
We will now paint the buildings on the right hand side of this scene.
Make the distant ones very light and not so distinct with the colour leaning towards the blue grey (e.g. Cobalt Blue with a touch of Burnt Sienna and then as your move towards the edge of the paper add more pigment to strengthen the mix and warm it up with warmer colours (Burnt Sienna, French Ultramarine (instead of Cobalt Blue), Alizarin Crimson. Keep varying your colors. The tree is painted using Cad Orange. With swift expressive brush strokes leave highlights on the closer buildings to hint at windows and high lit parts of the walls.
I paint underneath the awning with French Ultramarine, Alizarin Crimson and Burnt Sienna leaning towards the blue. I leave some highlights here too.
I run some of the building colour into the front of the car and tram to connect them with the bigger shapes.
STEP 4
Next we paint the buildings on the left hand side.
Start with a strong mix of French Ultramarine, Burnt Sienna and some Alizarin Crimson for the parts above the awning and then lighten (by adding more water) and cool (by adding more blue) as you move towards the distant sections of the scene. At first leave highlights and sharp edges and then soften these edges towards the distance.
Under the awning lean the color more towards the blue as can be seen in figure 5. Leave unpainted areas as impressions of windows, signs and table tops. Paint around the figures if you can.
STEP 5
Painting the lamp posts, cars and tram come next. Keep in mind where the light is coming from as this will tell you which sections of each object will be lighter than and which will be dark. Make sure as well that objects which are closer to the foreground are stronger in tone that those in the distance. I used a pale green colour for the tram.
We can now finish the painting by doing the figures (again more detail and stronger tones of the figures closer to the viewer), shadows under the cars and tram as well as texture and shadows on the road surface.
I also added more color to the tree (more Cad Orange).
Finish off with signage, power lines, birds, etc.
Happy painting!
Joe Cartwright


